THE IDEA
January 7th 2013
After finishing up the lot, I started to realize that it gets to be a bit of a pain in the ass to bring the camper down. Usually, we head down on Friday after work. By the time I get home from work, get the camper hooked up and loaded, get down to the lake and get set up, I'm beat. Some friends of ours, Russ and Debbie, have a camper that they leave on their lot full time, and I thought... Man, it would be nice to just hop in the car and drive down. However, I didn't care for the idea of leaving my camper there full time.

They wanted close to $6500 just to build the shell. As Mike is a journeyman carpenter and an all around handy guy, I drug him over to the store and showed him the shed. I asked him how much it would cost to build a shed like that and he did some figuring and it came up to less than half the price if we do the labor ourselves. Now my mind started churning. I even went on Autodesk Home Designer website and started playing around with layouts and designs, just to get a feel for how it would work out.

Homestyler has a great feature where you can select colors and textures, and then generate a high-resolution rendering of your layout. It's damn cool, but somewhat limited in available options. These pictures show the rendering of the layout above. The stair bannister and rails are all wrong. They are too 'colonial', but that was the only stair type available. The decor for the walls are a bit off too, but it gives you a good idea of what I had in mind. It will be interesting to see how the finished product compares to these initial pictures.


CONSTRUCTION BEGINS
July 21 2013
Using my end-of-year profit sharing bonus, I set up a budget. It took a little time for my wife Kelly to get fully on board with the idea, but after one to many times of seeing me stressed out trying to get to the lot and get the camper set up before we ran out of light, she came around. We discussed location, and we chose the upper left hand corner of our side of the lots.

I did not want to truck in dirt, nor try to cut and level that spot, so I decided to put the cabin on concrete piers. Not that it didnt work out ok... but, give the chance to do it over, I would have levelled the spot and put the cabin on gravel. After getting approval from the lake trustees, I started with laying out the piers. I started with just one per corner. The forms are in place, but not cut to height yet. The front right pier will actually be about 6 inches below grade, the front left will be about 9 inches above. The left rear is actually at the correct height.


Also, you can see that I added another set of piers in front of the front ones. Kelly really wanted a porch on the front of the cabin, and if I was going to do it, I was going to have it covered. Mike's dad had a clever idea and said rather than just build a roof over the porch, why not extend the top floor out 4 feet to give more upstairs room and act as a roof over the deck? Brilliant! I really liked that idea, so much so that I instantly agreed and installed the extra piers for the overhang. This is a picture of what he had in mind I found on the internet. This kicks the upstairs out to 20 x 16 for just a little added cost.
 | |
| not my actual cabin. |
With the piers in place and allowing a couple of weeks to cure, we started in on the floor. And now you see why I wish I'd have just leveled the spot up with a bobcat. I wound up having to trench for the floor joists in the upper corner, and that was a lot of back-breaking work. It probably only would have cost a couple hundred bucks to get a guy in with a bobcat and level it out. I could kick myself in the ass... but by that point, I was committed to the plan.


Finally, we had all the joists in place, and the floor leveled and square.


And we put down the decking. Notice the green bottle of OFF bug spray on the deck. That was the only thing keeping the mosquitoes from sucking us dry. It was a horrible year for bugs, and digging in the dirt seemed to really stir them up.

A few weeks later, I ordered up all the lumber to build the shell and took it all down to the lot, along
with the doors and windows.
 |
| One complete cabin. (some assembly required) |
August 31st 2014
Over the labor day weekend, the crack carpentry crew prepped for battle.
 |
| Job #1, the right tunes on the radio |
In very short order, we had two walls up.


Then a third...

And the front.

Finally, something I know how to do!


Did I mention that it was hotter than any 7 Hells you care to name? Check out the swamp-ass on Mike's son Micheal.

Looking good...

Once the walls were all up, square, plumb and level, we started framing for the upstairs floor. Here you can see Ray sitting on the overhang over the front.

Pretty nice ceiling height inside. Mikes either working up the bill, or ordering pizza.


Last job of a long, hot day.

After that, it was time to go jump in the lake. I cannot tell you how much I appreciated the help of Mike and Michal, Ray, and his son Raymond and all the wives and other kids. I could not have done any of this without them.
Day two was getting the rafters in place. They were made on site, so it took a little bit of figuring out to get the angles right. But once we got going, it went pretty quick.


Not two shabby for two days work. I wish I could take credit for any of it. To me, it's amazing to work with an expert. The things that I would have never figured out came as naturally to Mike as breathing. But wait till the electric goes in, that's where I'll shine!
October 19th 2013
After another few weeks of little progress, I picked up the roofing tin, some plastic to use as a vapor barrier, and the lumber to frame up purlins to hold the roof tin. Mike and I went down and got the roof installed. It was the first time I ever did anything with a metal roof. Once we figured out a process, it worked really well. I like the look far better than shingles, and I'm betting it was easier to do too.


Then we hung the sheathing on the gable ends.

A look at the upstairs from the stairwell looking forwards. we wound up with just under 8 feet of headroom at the center. I might need to duck a bit as I get to the lower parts, but Kelly will be OK anywhere in the upstairs.

What we wound up with.

I came back a week or so later and put in the sheathing around the bottom to close it all off. That was pretty much the end of the construction for the year, as it was turning cold. I did manage to score a killer gas fireplace over the winter. It should heat the whole cabin up pretty nice if we ever stay down at the lake when its cold. Even if we never really use it, I just feel that a cabin should have a fireplace, dammit!


April 6th 2014
Winter finally started relaxing its grip, and in April of 2014 we got back into cabin building mode. First thing I did was start roughing in the electric lines. The cabin is not going to have an abundance of things in it, but I know we are going to have lights, ceiling fans, the fridge, a couple window-style air conditioners, and a TV/DVD setup for rainy days. As it seems that we are always plugging in adapters or power strips because we never have enough outlets. So I decided that every outlet will be a dual duplex, meaning 4 individual plug-ins. That ought to be enough.


I'm also going to run some surround sound speaker wires before I drywall. I have my eye on a DVD surround sound system that's only $180, and sounds really good. I cannot stand listening to the crappy little speakers built into the TV.
Mike also came down and started framing up a small 'bathroom' upstairs. Seeing how our Porta-John is on the far corner of the lot, I can't see Kelly slipping on shoes, shirt and shorts just to take a quick middle-of-the-night piddle. Again, we have no running water, so I am going to use a small camping toilet like the one pictured below. It's a Thetford Curve electric flush. It gets very good reviews, is odor-free, and easy to empty.

The true genius of kicking out the top floor 4 extra feet really shows. The bathroom will be about 3 1/2 feet wide, and extend out about 6 feet. I plan on using the extra space for a storage locker for cleaning supplies and linens. Of course, the fact that the gambrel roof on the upper floor meant all kinds of tricky angles and crap deal with in framing it up. I tried one time to do it myself, and nearly threw the hammer through the window. Just when I'm getting the hang of framing up square stuff, I have to do this stuff. Needless to say, it took Mike a few minutes of figuring, and boom! Walls and a door opening.


We also discussed stairs options, and Mike came up with a plan that didn't waste too much floorspace. My idea for a simple knotted rope did not pass the Kelly test. We also started planning for a deck/pavilion for the lot. But that's another page for the blog
June 2nd 2014
Cabin work seems to come in fits and starts. We all camped down on the lots for the Memorial Day weekend. Mike got down there around 3:00pm on Friday, but we couldn't head down till after Kelly got home from work so it was near 6:30 before we made it to the lake. To my utter shock and surprise, there was something waiting for me in the cabin...
STAIRS!

Not exactly sure how the guy does it, but in about 3 hours, he made a complete staircase out of nothing but a pile of lumber. I was totally awed. But that didn't stop me from giving him just a tiny amount of crap for not taking pictures of the build for the blog. Now with stairs firmly in place, Kelly finally got to visit the upper floor. She didn't like the stepladder we had to use, so she never ventured any higher than sticking her head above floor level. The cabin actually had some 'tenants' over the weekend. Mikes son Andrew, and Ray's boy Raymond set up a cot and air mattress upstairs and slept in the cabin. It was a slightly cool weekend, so we ran an extension cord over so they had a couple of fans and a light and a place to charge cell phones. (Kids. Sheesh!) Man, I am really digging being down at the lake more and more.

Nothing else got done that weekend because we spent the rest of the time on the lake. I had the pontoon boat down there, and Mike brought the two Jet Ski's he bought for a song and fixed up. Unfortunately, despite starting and running like a champ in his garage, one of the two decided not to start once we got down to the lake. But the other one ran great. We just used my boat as a private floating dock/swim platform, and a couple of people would take the Jet Ski out for a blast. When they had enough, they would come back and someone else would go out on it. From the time it hit the water, it never shut off till ran out of gas and had to be turned to the 'reserve' setting.


One of the coolest things I have ever seen happened on Sunday. Sitting out on the pontoon boat and just generally chillaxing, when I notice a huge bird a bit of a ways off. It banks and turned broadside to us, and I clearly saw the white head and tail. I'm like "THAT'S A FREAKING BALD EAGLE!"
He swooped down and attempted to catch a fish or something, but missed. He started climbing again, and flew just off to the side of my boat, about 50 feet high. He looked like he had a 6 foot wingspan. The really cool thing was he let out a screech as he was going out of sight over the treeline.
We see Eagles in this area from time to time, but almost always on the Mississippi river. We were a good 15-20 miles from the river, and I never seen one that far away and I never heard one screeching.
The damn thing was that there was 3 or 4 smart phones and a camera laying around right there, and not one person thought to grab a picture. We were all caught up in the moment of watching one of the most majestic sights in nature.
I'm totally bummed that I didn't get a picture of it, but I scoured the internet and found a picture that looked exactly how the eagle looked to me going over the boat.
 |
| Not the actual eagle I saw. |
The next weekend, we went to a local park/pool that is closing and selling all their fixtures and stuff. We scored a couple of nice picnic tables. On Sunday, I headed down to finally see about getting the trenching done for the electric to the cabin. It was quite a struggle with Home Depot to get the cable I had ordered, but it finally came in on Friday. I rented a ditch-witch trencher and hoped that my measuring was right and I had enough cable. I had nightmares about coming up 6" too short. I also picked up some framing studs and other supplies.
Mike brought the new picnic tables over and I commence to trenching. If you never seen a trencher in operation, It's like a big chainsaw on wheels. Once you get the chain lowered into the ground, the wheels (or tracks in this picture) pulls the machine backwards as you try to hold on, desperately hoping you don't hit big rocks, roots, or anything solid because you friend the trencher will turn on you and try to kill you in a very loud and messy way. Notice also that you actually face away from direction of travel as you operate it. That is important to what follows next.
 |
| This man died making this picture. But the trencher is OK. |
Now, I have used on of these things before, but this one was slightly messed up. You can control the speed of the wheels separately as its cutting, so as to maintain a nice straight cut. But the one wheel of this trencher was as weak as a newborn kitten, so the damn thing pulled to the left harder than an California democrat.

I started at the cabin and cut the trench to the electric pole. In the picture above, you can see where I was smoking along, making good progress and generally thinking Life is Good. Then I finally decided to look behind me and realized that I was not only going to miss my electric pole, but I was actually lined up pretty good to hit the electric pole in the lot across the street. Chikushō! Bakayarō! I had to abandon that run and reset the trencher. As you can see, I still fought the left curve the rest of the way. That big hook near the middle was where I had to port around a huge-ass rock that was just below the surface. As I got near the Electric pole, I realize that even though I personally put the electric lines in the ground for the camper pads, I only had a vague idea where the line for mine ran. So to be extra safe, I swung wide and then did a 90 degree notch over to the pole. The good thing was I had plenty of cable. I also ran a wire for the future pavilion from the pole.
While I was fluently cursing the trencher, Mike was quietly doing the amazing again. I had asked him to frame up the wall and hearth for the fireplace, as I wanted it on a 45 degree angle in the far corner of the room downstairs. From long experience, I knew that framing on a 45 is waaaaay beyond my abilities. He only asked me how high I wanted the fireplace off the ground, and how big a ledge I wanted (1 foot for both). BOOM! There was my fireplace wall!


I did ask him to add that 2x8. I am not sure exactly what we are going to do for a mantle, but I figured a big, solid piece of lumber across the whole top would be great for just about any option. Its really starting to look the way I imagined. Just go back to the top and look at my renderings of the computer mock up.
Other than adding a couple 2x4s here and there in the corners, I am ready for insulation. I also made a command decision on the decor of downstairs. But its a secret. Shh!
June 9th 2014
Just a minor update this time. Kelly and I went down on Sunday and hung the insulation on the bottom floor. There are a few pieces missing in the photos because I still need Mike to come in and put some additional blocking in. Mostly in the corners.
It took me about one full wall before I settled into a routine that worked well. It took about 4 hours to get the bottom done, which includes moving a bunch of crap around in the inside. It don't show in the photos, but the cabin accumulated a lot of stuff like chairs, ladders, my camp kitchen, a mattress, a dog kennel, and a bunch of tools like shovels and rakes and such. The cabin makes for nice secure storage, but it's getting a tad crowded.
You will notice that I am not wearing the recommended long sleeve shirt. Not a good idea.


This actually wasn't much of a problem for 3-1/2 walls. But the last wall I did was the front wall, and it has all these little odd-sized cavities due to the framing for the door and window. So that meant that I could not just cut a piece to the right length and put it up. I had to cut some to the proper width too. That's when the insulation really started getting all over me. When I do the upstairs, I don't care if its 104 degrees... Long sleeves are the order of the day. Even after a very long shower, I could still feel some rather uncomfortable itchiness. Made for a terrible nights sleep.


At the end, I noticed a sizable reduction in noise in the cabin from vehicles going up Possum Hollow Road. That is a good thing because anytime a car or 4 wheeler goes past, it sounds just like they are coming up the driveway.
 |
| View of the kitchen area from by the fireplace. |
June 30th 2014
Had a couple of good Sundays over last two weeks, and we crossed a major milestone. We are electrified! Ray and Raymond came over last Sunday and helped me hook up the feeder cable to the cabin. I'm really happy how it turned out.

It runs up the pier in the far left hand corner, right up under the electric breaker panel I installed a while ago.

You can see a little of the junk that is starting to accumulate in the cabin. It's only temporary right now. We are using it as a storage shed for the summer. It makes it a tad harder to work around, but its beats hauling all our crap back home every weekend.
It turned out to be cheaper to buy 2 gauge triplex aluminum direct burial cable than to by just the conduit to bury copper wire. I only needed 60 amps in the cabin so with the big cable, I have 125 amps capacity. Way more than I need. Ray's lot is situated directly behind my cabin. To save him from having to run cable all the way from the pole, I'm just putting in a 30 amp breaker into my panel, and sending it over to him via an overhead wire. It has to be overhead to get through the gully behind the cabin. He had acquired some #6 copper cable with a carrier, and we installed it on the back side of the cabin.

We still need to pull it over to his side and make the final hook ups for him, but that should be easy. As we were working, some pretty serious storm clouds started moving in. It turned dark as night. Inside the cabin is pretty dark anyway. It was like working in a cave. But we hooked up a few of the outlets downstairs, and I flipped on the main breaker.

It may seem like a small thing in the picture, but this is a significant milestone. If you look closely, you can see that little light is plugged into the wall outlet. We are running on internal cabin power, and it really made my day. The skies opened up shortly after, and we had a tremendous rainstorm. Ray, Raymond and I pulled out the lawn chairs, and sat in the living room of the cabin under that puny little light and watched the rain fall.I figured that was a good place to end, so when the rain finally let up, we packed up and called it a day.
The next Sunday, Mike and I went down and I finished up wiring up the outlets and switches. Below are extremely rare pictures of me doing actual work on the cabin. Most of the time, I am the guy taking pictures, so I never wind up in very many of the shots. Here I am wiring up the outlets that will be on my side of our bed upstairs.


While this was going on, Mike framed up the locations for the A/C units. I am still sitting on the fence on whether we need 2 A/C's (one upstairs and one downstairs) or if we can just get by with one upstairs. I had already wired up an outlet downstairs for putting in an A/C, so I asked Mike to go ahead and frame up an opening the same size as upstairs. If I decide to put the bottom one in, all I have to do is cut the sheathing and drywall out and slide in a unit.

The unit is a 10,000btu window unit that I bought from Mike's brother Greg. It's a pretty small size unit, but it weighs a ton. Mike put in another stud, a top and bottom plate, and cut out the sheathing with a sawzall.


I didn't realize it, but Mike went ahead and slid the unit into the hole. I had already had the outlet wired up, so of course I had to turn it on.

I am fairly impressed with this little unit. It was pretty quite, and cooled the upstairs down noticeably. I still don't have the insulation installed upstairs, and the metal roofing was pretty darn warm. Also, I dont have the end-caps on the roof yet, so its not like the upstairs is sealed in any way. But with the windows closed, you could notice it being cooler and less humid upstairs in 10 minutes or so.
After the A/C was in, I finished up the light switches, and Mike started putting up the blocking for the drywall. I guess you can say we gave the electric system a good stress-test. We had the A/C, the nail gun compressor, my blower, and a couple lights going all at once. No problems at all. Its SOOOOoo nice not having to work off an extension cord that we ran down from the camper. I was planning on putting the insulation up upstairs, but I came down with a bad case of screw-it-itis. I figured we did enough for one day. One more good day on the insulation, and we can finally start work on the finishing work.
July 15th 2014
Nothing earth-shattering going on over the last few weeks. We had the whole gang down for 4th of July, so only a little work was done over that weekend. I put up a little insulation upstairs, and Mike and Ray put up the corner trim on the front of the roof. The big job we tacked was more for the lots rather than the cabin. Ray's lot is to the side of mine, but there is a sizable gully between the two. We've been talking about building a foot bridge across the gully to join the two. Ray and Mike manage to get a hold of a few discarded telephone poles, with the thought of laying them across the gully for the foundation of the bridge. They took them down earlier in the week, but now we had to figure out a way to get them across the gully.
The first thought was to just hook them up to my mighty Arctic-Cat 4 wheeler. It may not have the engine size that some of the newer ATVs have, but it does have a triple-reduction transfer case.

It seemed like a good idea at the time, and she had plenty of torque and power, but what it was lacking was weight and traction. All it done was spin its little tires on the ground. Time to drop back and punt.
Now its no secret that my truck, "The Big Unit" is a pavement princess. I've only ever had it seriously off road once (or actually twice, if you count driving over the rocks at the Goose Creek Rec Center). It never does any actual 'work'. Other than pulling the boat, camper or the odd trailer, it lives a pretty easy life. But it was right there, and the only truck that wasn't currently hooked to a trailer at that point...
Carpe Diem! or maybe Carpe Polus!

With surprisingly little in the way of fuss, The Big Unit snatched the first log across the ditch.
We had dug pockets into the sides of the gully to hold the poles, and just a little work with a pry-bar and the first pole was in place. When they dropped off the poles, they put a couple on one side of the gully, and a couple on the other. It turns out the poles we decide to use were on opposite sides, so I had to reposition the truck to the other bank.


The second pole nested nicely in the pocket, which I attribute to expert driving on my part.
 |
| First one across the bridge! |
Being the holiday weekend, we decided that would be enough with working. The sun started going down, I had a whole mess of kabobs on the grill. What was a pleasant afternoon turned into a fantastic evening with a good campfire and smores all around.
 |
| Best Buddies |


All in all, it was a fantastic holiday weekend, even if we didn't get much accomplished.
The following Sunday, Mike and I went down, with the express goal of doing actual work. He wanted to finish up some of the trim for the roof, and I wanted to finish the insulation upstairs. I first started out in the hole when the air conditioner would not come on upstairs. It kept tripping its internal GFI. I double-checked my wiring, it was perfect (natch), and no matter what circuit I plugged it into, it would trip the GFI instantly. Except for one time it stayed on for about 2 minutes, then tripped. I just took the fan upstairs and climbed into my jumpsuit. I vowed even if it was 100+ degrees, I was not going to do insulation in shorts and short sleeves.
Even before I could really get rolling, I had to kill about 40 wasps that had 3 good size nests going upstairs. I had no wasp killer, so I tried some Deep Woods Off. Important safety tip! Off does not kill wasps, it just pisses them off, rather severely. I looked like a drunken Marcel Marceau practicing karate moves trying to swat wasps out of the air with a glove, while not getting my ass stung to death. In the end, I emerged victorious, with the floor littered with wasp corpses and body parts. Hell, I even managed to shoot one wasp with the staple gun from a range of about 8 feet. Yippie Ki Yea!
The sun baking the metal roof turned it into an oven. Even lightly brushing the metal would leave a painful burn. There was little wind, and the upstairs was like an sauna. I got to the halfway done point when I had to take a break. Sitting outside in the shade, we heard a fearsome screech that sounded like it was right in front of my truck. I look over, and in a low branch I saw this.

Look carefully just above where the two trees fork apart:

I think it was a Red-tail, but it was definitely a hawk of some sort, about 20 feet away. He was just cold-chillin', hanging out and enjoying his day. He preened a little, but just generally sat on the branch for about 30 minutes not doing much of anything.
After I cooled off and rehydrated, I decided that I had to get the AC working. So I cut the faulty GFI off the end of the cord, and had to hard wire the unit into the circuit. I'll get a plug for it later. The unit fired right up and started doing its thing. The internal temp display said 92 when it started. There was noticeable cooling wherever the insulation was, but it was still dreadfully warm by the bare metal of the roof. I managed to get all the roof insulated with the exception of the corners. I knew I wouldn't get the gable ends done, so I just decided to leave the corners till I did the ends. I know I said this last time, but one more short day and the insulation will be complete.


In the end, for the first time ever, the upstairs was cooler than downstairs. After I finished up, I let the AC run for awhile. It was actually starting to get comfortable upstairs.
While I was doing all this, Mike was busy on the outside, putting up the roof trim and some other trim around the AC and the rear window. I realized that I never took a picture of the back side, so I crossed the bridge and did just that.

It really looks nice and finished with all the trim up. I'm thinking I might add gutters and collect the rainwater into the water cube. I bet it would be worth the effort.
Mike also put in all the blocking that I needed in the corners. This will support the ends of the wall and ceiling coverings where they meet the corners.We are so close to starting the finishing work, I can almost taste it. Or maybe that's just fiberglass.

We are just a couple of days away from the one-year anniversary of the start of construction. It seems like a long time, but working here and there, on odd weekends, I am pretty damned proud of how far we have come with this project.
October 27th 2014
It's been a while since I have updated this blog, but it don't mean that work has not progressed. I had a bit of a deceptive reason for not making any posts. For quite some time now, Kelly and I have been mulling over options for finishing the interior out. We discussed colors, finishes and things like that. But it was all a ruse. I even hinted at it all the way back in the June post. All the talk and looking at color samples was just to throw Kelly off the trail or something special I had planned.
A little while ago, we spent a lovely, long weekend with friends in a cabin we rented in Gatlinburg TN. This cabin had all knotty pine interior, and was decorated in a Christmas Holiday motif. I could tell Kelly really loved the place, so a while back, I sat down and crunched some numbers to see how much more going with knotty pine inside would be over just doing drywall. Turns out, when you factor in the drywall, mudding and taping, texture, priming and painting versus knotty pine tongue and groove, it would only be about $600 difference overall. That was an easy decision to make. But I wanted to make it a surprise for Kelly, so for a month or so, I kept referring to doing 'drywall', while Mike and I would go down and put up the pine.


Probably the trickiest bit was doing the stairs. Not really that hard, but just had a lot of cuts and angles to think about.


The fireplace was left open as I still need to hook up the gas supply, and then I will cover it with cement board and a rock veneer. I am hoping to find suitable rocks on the property. I have seen some good places to go get some rock on the trails below the dam. That, of course, is a project filed under the "later" banner.

It don't really show up in the pictures, but the board have 2 sides to them. One side had just a flat surface, the other side has a v-groove milled down the length that makes it look like two narrower boards. We put the flat side out on the walls, and just to have a different 'texture' for the ceiling, we put the v-groove out.


Mike taught me a lot about how to put up the pine T&G. So much so, that I felt up to the challenge of continuing the back wall (with the stairs) up into the second floor by myself. Not too shabby if I do say so myself...

Kelly finally came down to the lot after we had the bottom floor done. After getting all set up in the camper, she finally walked over to the cabin to see how the drywall was coming. Of course, Mike and I were about busting at the seams waiting for her to finally decide to walk over. I didn't want to even tell her to go look at it, I didn't want to ruin the surprise. When she walked in, it literally took her breath away. She gasped and for a second couldn't even talk. She finally looked at me and sputtered "I thought you said you were doing drywall!!!" Leaning against the door frame, I just adopted my best nonchalant smug expression and said "I just knew that guy at the lumber store sold me the wrong stuff." C'mon baby... Did you really believe that I was just gonna do plain old, boring-ass drywall? The plan worked perfectly. You couldn't have knocked the grin off my face with a hammer.
When I got the second load of pine, I bought out every single piece of usable wood at the store. It's not enough to finish, but I think I can do the front wall upstairs, and maybe half a side wall. As the summer winds down, the work on the cabin will slow down. I had hoped to be completely done with the interior this year, but I am learning that making a schedule is one thing, keeping a schedule is something totally different. But I'm not gonna let the schedule slipping upset me. I figure as long as we make some kind of progress every week or so, we are in good shape.
March 18th 2015
Winter had shut down construction again. Very little, if anything was done to the cabin. But now that the weather is turning warmer, the hammers are swinging again. The big milestone we crossed was that we completed the installation of the knotty pine siding upstairs. This was one of those jobs that just had to be done before we moved on to anything else.
I went down by myself during an unseasonable warm day in December and finished the stairwell, and the sides of the bathroom. In January, we had another nice weekend, and Mike and I camped down at the lake over the weekend, and put the wood up on the wall next to the bathroom. That is where the headboard of our bed will be.


Just as we had a good rhythm going, we ran out of wood. The last time I went to the lumber store, I bought out every single board that they had. I knew it wasn't enough to finish up. It kinda sucks to get going on a good roll, and then running out of material, but what can you do? Of course, all work and no play make Jack (or Tim and Mike) a dull boy. We had our UTVs with us, so we figured it was a good time to go get 'em muddy with some of our friends at the lake.


There is a large trail network below the dam with all kinds of terrain. We had a lot of fun, and met quite a few new friends. We got back to the lots just around dusk. As we were getting the fire going, I noticed that the sky was a fiery red. We can see much of a sunset from our lot, so we buzzed back down to "Moon Mountain" which is an overlook just over top of the dam. We were rewarded with this picture. I think I'm gonna have this one framed for over the fireplace...

This was the last nice day we had for about 2 months. Nasty, rainy, snowy cold weather thru the rest of January, all of February, and the first half of March. But then we started getting some reasonable weather, and we went back down in March to camp again.
Mike estimated I needed 50 more 12' boards to finish up, and wouldn't you know it, the guy had it figured EXACTLY right. We used all 50, and mostly had little 5-10 inch scraps left. I guess honestly I cant say I am exactly done, as I forgot about the back wall in side the bathroom. I have the bathroom crammed with stuff like leftover insulation and other debris, and I totally forgot about it. So I have just a skosh more wood to put up, but that will take less than half an hour. I am so happy with how the whole cabin turned out. Even without the trim up yet, it looks awesome.
 |
 |
| Looking forwards from the stairs |

 |
| looking backwards from the front wall. |

This is the look I am going for. Now I just gotta figure out how to do it...
March 31th 2015
So I had been playing round with ideas for finishing the walls. Most people I talked to seemed to think that a coat or two of sealer, followed by stain, and then topped off with 2 or so coats of polyurethane is the best way to finish the wood. I'm not one to disagree... but that is a metric TON of work. I was not liking the idea of taking the rest of the summer just to finish the walls and ceilings. I bought a small sample of stain in the color we like, and stained a test piece of the wall siding. I did not use a sealer, as I wanted to see if I could get away without it. The results were horrible. Very blotchy and just not attractive. The seal/stain/ploy idea looked like the only way at that point.
Then I found something called Polyshades by the Minwax company. It advertised itself as just the ticket. 1-step stain and poly all together. Mike just happened to have a quart in his garage. I did another test piece and the results were 'passable'. Not ideal, but it looked like the best way to avoid all the steps of the traditional way. I did some research and a lot of people hold Polyshades as just about the worst crap man has ever made. Just barely OK for very small jobs, but absolute disaster on larger ones. Most reviews were by anal-compulsive "master craftsman" type woodworkers. I think they have unusually high standards, and what they view as 'crap' would be good enough for me. But still...that got me nervous about even trying.
One of the forums I frequent has a "home and property" section. I posted up if anyone had real world experience with the Polyshades. The reviews there were kinder, but still not enough to fully sway me. Then one guy suggested using amber shellac. He says that its a 1-step finish which seal and protects the wood, just not as good as poly. It even has that nice golden tone to it that I want. I read up on it and it started looking better and better.
First, a lesson. Shellac is a resin secreted by bugs in India and Thailand. Shellac is a natural bio-adhesive polymer and is chemically similar to synthetic polymers, and thus can be considered a natural form of plastic. It is dissolved in alcohol and applied to a surface, where the alcohol evaporates, leaving behind a hard finish. It goes back 3000 year as a wood protector and finish, and was very popular up till about the 1920's. It seems to have a reputation as hard to work with.
Trying the cabin-building version of a Hail-Mary pass, I went to the local hardware store and bought a quart of Zinsser Bulls-eye Amber Shellac.

I grabbed a couple pieces of the siding, a brush and a roller. In the garage at home, I tried it out. I found it pretty easy to work with. It brushed on great right out of the can. It rolled on ok enough, but the surface had some imperfections. I found that rolling it on and then dragging it with a relatively dry brush gave excellent results. The first coat really filled me with hope. It had the color I looked for, just still not quite as 'rich' as I wanted. It drys extremely fast. Like 15-20 minutes fast. I did a number of pieces with various number of coats to see what worked best.

The picture above shows an unfinished board with a couple of 1-coat boards above it and a 2-coat boards to the outside side (with v groove up) and a 3-coat board next to it (v groove down) . This as in direct, blasting sunlight, so my phones camera had a bit of error in the color balance. The 2 and 3-coat boards did not look as dark in real-life as they do in the picture. I really liked the results of 2 coats. I took the boards inside to get better pictures


The picture on the left is a pretty good representation of the true color. A nice, warm honey-gold. The picture on the right is with the flash on. It throws the color balance off, which darkens the look (notice how dark the carpet looks) but it show the sheen of the finish. Just perfect. Not too glossy, but still with a bit of shine. This was more than I could have asked for. Of course, there is always a hitch to my plans. The local store only sold it in quarts. I need gallons. They sell it by gallon on-line, but not at the physical store. I was itching to try it out on the walls. Painting a small piece laying on my workbench is one thing. Painting a whole vertical wall might be something totally different.
We picked up a couple of quarts, some roller covers and brushes, and denatured alcohol for cleaning up, and headed down to the lake. I figure the most inconspicuous wall is the upstairs bathroom wall facing out bed. A good a place to experiment as any. I picked a roller without much nap, so it didnt cover the grooves between boards very well. Kelly had to cut those in with a brush.


I was ticked and thrilled to find that the shellac went on easier than you could believe. I just rolled on the shellac, and Kelly followed with the brush, getting the grooves, and brushing down the roller marks. I went ahead and did around the door to the bathroom as well. By the time I was done, the side-wall was dry. We stepped back to take a look. MAGNIFICENT! What a beautiful look. As it turns out, the test boards I grabbed were pretty free of character. No real knots and rather indistinct grain. But on the walls, the shellac really brought out the character of the wood. Again, just the right amount of sheen, as shown on the door wall.
Kelly wants to stop at one coat for fear of making it too dark. I think it needs one more. I agreed to do the whole upstairs with one coat first to see how it looks, before possibly putting down a second coat. That also gave me a way to judge how much shellac I will need. The 2 quarts did the bathroom door and side walls, The wall and ceiling behind our headboard, and the front wall of the bedroom. Not bad. I figure that's about half of the upstairs.


The best part was in only took about 2 hours, of which, Kelly spent a half hour chatting with Rosemary and leaving me to do the whole front wall pretty much by myself. Fast, Easy and Beautiful. Never are you gonna get all three at the same time!
The next week I picked up a couple gallons of shellac, and we went down and finished up first coat on the upstairs. I did the small wall on the side of the bathroom door with a second coat, just to see how it looks. I think it looks far better with 2 coats than 1, even if Kelly insists that it looks fine without it. We had just enough shellac in the first gallon to do the 'headboard' wall up to the ceiling. I took another picture of that area. I'll let you be the judge.

May 19th 2015
It was Kelly and Mine's 27th anniversary, and she told me that she wanted to spend it down at the lake. Works for me! 4 days and 3 night of camping, including a big ATV Poker Run at the lake. We have spent a Saturday since the last post finishing up the second coat of shellac upstairs, but I totally whiffed on getting pictures of the finished product. I'll give you a hint, it looks great.
We had also finally decided on and purchased the flooring. I wanted something that looked good, but I didn't want to spend $3-4 a square foot for it. I wanted a darker color, and I wanted a texture to it. To me, nothing looks cheaper than blond pine laminate with a smooth surface. Home Depot had a sale on a one-time purchase of some 7-mil "hand scraped" Hickory laminate. While nobody would ever imagine there was an Amish guy hand scraping the boards, they do have a nice texture. We had actually seen them first early in the fall, but I kept putting off getting them in case something better came along at a decent price. I figured I needed 25 cases to do the whole cabin, and I noticed that they were down to about 8 at my local store. Damn! They told me another store about 20 miles away had 55 cases, so that finally prompted me into pulling the trigger. The laminate was $.99/sq ft. which was a screaming deal as far as I am concerned.
Now... I have never laid laminate in my life. Other than the 25 or so square feet of tile I put down in my theater's snack bar, I've never done flooring at all. But the instructions were pretty clear, and once I got my head wrapped around making sure I measured from the proper end of the board, I had no general problems with the laminate. However, I did have two problems with the overall installation.
Problem #1 was that the floor upstairs was far from flat and level. Bearing in mind that the cabin is simply an over-glorified shed, we never really worried about making sure the sub-floor was dead flat. There is a little hump in the floor where the front wall is downstairs, about 4 feet from the front wall upstairs. This hump made getting some of the laminate to snap together correctly a chore. Also, being 4 feet from the wall, It lines up with the seam in the plywood sub-floor in places. There was about a 16th to 8th of an inch difference between the heights of the plywood. Not ideal, but there is nothing I could do at this point. I decided to press on and hope for the best.


The first 6 or so strips showed in sharp detail problem #2. Namely, that I am not used to, or built for, kneeling down all hunched over. It only took about 20 minutes to put down the underlayment and first few strips, but in that time my knees and back started begging for mercy. I stopped for a break and never started back up again. I figured that I had a few days to put it down, and it wasn't terribly complicated, so I just left it alone till the next day. We did a little running around in the nearby town of Farmington, MO, and had a nice Anniversary Dinner. I also stopped by Lowe's and picked up some knee-pads.
The next day (Friday), We hit it again. It worked out very well with Kelly feeding me the planks and me putting them down. I pre-cut some of the end pieces so we could just keep rolling along. Within about an hour or so, we had covered all of the full-length floor area, and a few strips from the bed area, which is shorter due to the bathroom. The knee-pads were a godsend, as my knees were fine, but my back was a totally different matter. I laid out on the floor for a moment and every muscle in my back tightened up. I lay there sweaty and covered in sawdust thinking: This is it. This is how I die. After 20 minutes or so, I manage to get to my feet and stumble downstairs and out to my camping chair. That was enough for the day.


On Saturday, we had the "Goose Creek Goons" poker run. The Goons are a social (read: Drinking) club down at the lake that does a lot of very good things for the community.

This just some of ATV/UTVs that showed up for the event. One guy had a wicked cool drone, and took some stunning aerial movies of the event. Part of the poker run included them 'salting' some random litter around the lake with raffle tickets. Everyone was encouraged to pick up litter in hopes of scoring some tickets. We didn't find any, but we managed to pick up a couple good sized bags of trash. I thought it was an excellent way to beautify the community. Afterwards there was dinner and a dance, and a great time was had by all.
Sunday, I got back on the horse and finished up the floor. It went pretty well, and my back didn't give me too much bother. A quick pick up of the trash and a sweep, and the floor looks fantastic. Here are some pictures of the finished project. You can also see how nice the walls turned out, and how well the walls and floor goes together.


From the front wall looking backwards

One other thing that got 'installed' was our first piece of furniture. A little while back, Kelly had told me she wanted a chair or a little "reading nook" in the far corner of the bedroom. As we were running around during the weekend, we came across a rummage sale at the church in the tiny village of Lawrenceton. She found a country-looking chair that she just fell in love with, so I had to get it for her. After we got the upstairs floor done and cleaned up, I figured might as well put the chair up there.

The sawhorses are not permanent. They will come out after I get the trim up.

 | ||||
| Kelly in HER chair. |
I still need to do the trim, and finish out the bathroom, but at least now I can see with my eyes what the cabin will look like when it is done, rather than just imagining it. I'm starting to get really exited.
July 20th 2015
The first half of of summer 2015 has been almost a complete washout. It seems like it has either been raining, or had the forecast for rain every single day since March. This is what our daily weather report has been all summer.

It was so bad that it was the middle of July(!) before I could even get a chance to put the boat in. Needless to say, even though we are working on the inside, the rain has impacted our schedule to the point of total shutdown. But finally over the last weekend the clouds parted, and the sunshine descended to the earth on gossamer wings. And as poetic as that sounds, it does not prepare you for the instant change to 95 degree, 95% humidity days. Ugh.
About the only significant work that we managed to do was hang some gutters on the cabin. When the water runs off the roof sheeting, the edge is lined up perfectly with the trim on the lower part of the exterior walls where I had to add 10 inches or so of sheathing to make up for what covered the band board for the upper floor. This deluge pretty much washed out the caulk we put in there, and allowed some water into the bottom floor. Nothing major, but it needed to be dealt with. I figured gutters would be a great idea, as we could channel all the water that fell on the cabin away from it and into the gully in the back. Also, I will eventually pipe the gutters to where they will fill the water cube for showers, dishes and whatnot.
I wanted green gutters, but the only choices were white and brown. I figured white would be out of the question, so I bought brown. They don't look too bad. It would have been nice to get one piece, 20-foot gutters, but I had to make do with 2 10-footers on each side. I didn't get them terribly in line, but they do the job. I might try later to line them up better, but for right now, I got bigger fish to fry.
It was time to get cracking on the trim. I did some rough figuring and came up with a shopping list of 30 1x4 8-foot pine boards. As you can guess, this number was a little shy of what we needed. Kelly and I decided on a stain color of "American Walnut" for the trim. We had actually bought the stain some time ago. I set up an area in the garage at home where I could lay down 10 boards and stain them. Mike gave me some tips, but I was on my own on this one. It took me a board or two before I developed the proper technique, but in the end it was well worth it. Using rags cut from old t-shirts, I liberally spread stain on the board, then wiped off the excess right away, transferring it to dry areas of the wood. Including the edges, I could do 10 boards in about half an hour, before I would run out of room and have to wait a day for them to dry.
It amazed me how beautiful wood can look with an application of good, quality stain. It took a few days, but I had all the wood stained and loaded into the back of the truck. I asked Mike to help me as I knew doing trim was beyond my capabilities. We started on Sunday morning about 8:30, and quickly had all the baseboard up.

I finally got an angle plug for the window A/C unit. With the A/C running, it was actually very comfortable upstairs. It was a steamy 95 outside, and the little A/C had no problems keeping it at 70 upstairs. The downstairs was a different story, as it was about 10 degrees warmer. This pretty much convinced me that I will need the second A/C downstairs.
Pretty soon, we started up the walls. We could only go up the first part of the wall. The center of the ceiling will have a faux "beam" running down the length of the cabin. It will be a 1x12 with a 2x4 ripped down to the correct angle.

This will cover and finish off the gap between the two halves of the ceiling and also will give me a place to put lights and a ceiling fan. The ripped 2x4's and the 1x12 will be stained to match the trim. This beam will have to be accounted for when we do the trim on the 'upper' part of the walls.I don't have the material yet, so we could only go so far up the walls. This picture give you a pretty good idea on the 'gap' that will be bridged by the center beam:

Even though we could only go so far, we still got quite a bit of trim done. Sorry for the crappy pictures. It was kinda dark in the cabin, and the blasting light coming thru the windows played hell with my camera on my phone. Next time down I will get better pictures with my good camera.


This is about the most "complete" section of the trim. It really shows you how well the colors work together. I wanted the trim to give you a feeling of a timber post framed building, so we doubled up the trim in the corners. It really gives the cabin a woodsy, rustic feel inside.

We had gone about as far as we could on the corners, and Mike went ahead and trimmed our the the A/C unit. I am thinking about taking apart the cover and painting it brown to make it fit in better.

We then figured we had enough wood and time, so we trimmed out the windows. That really transformed the look of the place and made it feel finished.


We had to get a little creative in with the back window trim. Some idiot (me) didn't think things through when he put the light switches in. They are right next to the window frame, and it took a couple of ideas before we found a way to trim everything out to where it looks passable.

I'll have to move the switches out a bit in the box so the cover plate sits on the trim correctly, but it made the best out of a really bad situation. I'm going to go get about 10 more 1x4's the 2x4's to be ripped and the 1x12 for the beam and stain them. I'll also get a door for the bathroom soon. I am thinking staining the casing to match and using shellac on the door. If I can get everything together, I think one more weekend and the upstairs is done.
July 20th 2015
The next thing I wanted to tackle was the big, gaping hole in the middle of the ceiling upstairs.

The plan from the get-go was to do a false beam at the peak to give me a nice flat place to put the ceiling fan and light fixture, and to reinforce the "cabin-y" feel by simulating post-and-beam construction along with the wood trim.
I took the cut wood, the 1x12 and the extra trim boards home to stain them. I'm getting pretty good with my staining technique, as I didn't dribble hardly any on my garage floor this time. Where I was set up in the garage before, the floor looked like a scene out of Dexter with all the drops of stain that landed on it. Mike had to go out of town, so I was on my own for the install. I felt like a kid who just took off his training wheels. I was a bit nervous doing something that draws so much focus in a room like that. But I had figured I could at least try, and that if I got hung up on it I could just stop and wait for reinforcements.
The first step was to lay out the locations of the 2x4 'rails'.

Naturally, I figured that math would be the answer. The 1x12 is actually 11-1/4 inches wide. Half of that is 5-5/8", so I measured 5-5/8' down from where I figured the center of the peak laid at the front wall. I sunk a screw halfway at that point, and did the same on the back wall. I strung a line across the screws. My plan was to line up the first rail to that line, and let the 1x12 dictate the location of the second rail. I had to improvise a bit, because I needed to hold the other end of the rail up while I started on the far end. I made a quick-and-dirty jig to hold up the far end out of some scrap wood and the sawhorse.

So I get the first 8' of rail screwed to the ceiling. I had about 4 foot extra of the 1x12, so I cut a foot off of one and used it as a 'gauge' for locating the second rail. That's when the job went off the tracks. I get a couple screws in the second rail and I notice that it didn't look right. I broke out my level and confirmed that it was way off. I double-checked my measurements, they were right on. What the hell?!? It should be perfect! The engineer in me could not accept that math had let me down. I took down both rails and tried again. I re-thought the "center" point of the peak and moved my string-line to the new measurements. I put up the rails with just a couple screws and stood back. Still noticeably out of level. I got to thinking about the problem, Because I am working on the inside peak of a roof, any side-to-side movement will cause the bottom edges of the rails to be out of level, making the beam look cock-eyed. The locations of the rails had to be perfect, or there would be no way to make the beam look level. Even a quarter inch off would be too much.
One thing I am learning about carpentry is that when "math" and "level" have a disagreement, "level" should always win. I thought about how to un-knot this problem for a bit and hit upon a clever (for me, anyway) solution. As I had extra rail as well, I cut off a foot from two of them, and tacked them to the foot of 1x12 that I was using as a gauge. I wound up with a one-foot segment of finished beam. I held it up against the front wall and stuck my level on it. Once I got it level, I marked the locations of the rails (off a good inch from where calculated they should be) and did the same on the back wall. I re-strung my line and hoped for the best. I put the first rail up using the line, and with the 1x12 gauge as a guide, I put up the second rail. My level showed that the bottom of the rails were level all the way across the length of the rails. That was good enough for, me I screwed down the rails every 18" or so, keeping the first rail tucked up to the line, and letting the gauge dictate the location of the second. It took a bit of pushing and pulling but both rails were up and pretty straight and level.

I finished off the beam with the 1x12. I cut the length down on the first one so that the ceiling fan would land on the seam, hiding it as much as possible. What surprised the hell out of me was how warm it was between the rails. It was a 95 degree day, and I had the A/C going so the room was nice and cool, but the exposed area was right under the metal roof, and when I stuck my hand up there, it was pretty toasty. I figure that the beam will help keep the room temps even now that the whole area is sealed up.

I gotta admit, I was pretty happy with myself. The sides of the 1x12 lined up perfectly with the rails, and the whole thing was level. It was pretty easy going from then on to put up the remaining 1x12. The beam turned out looking pretty much exactly as I had thought it would.
 |
| Sorry for the wonky angle. I think I was drunk at the time. |

The last job of the day was to drill a hole for the fan/light wires, and pull them through. I'll have to get the fan up right away, as I could really use the light. It gets a bit dark up there when the sun goes behind the clouds. Just the way I like it, but it does make it a bit hard to see to work.

September 2nd 2015
Slow and steady seems to be the word the last few weeks. Nothing monumental this update, just a couple small items.
First off, we selected a ceiling fan that we both like for upstairs. It's amazing what a chore that was. We were constrained by a couple of factors. Firstly, it had to be a smaller fan, under about 46 inches, due to the fact that it had to be flush mounted on the beam. I needed it to be high enough that I didn't get whacked in the head by it, and being that close to the ceiling it had to be a smaller diameter. Also, it had to have a base under 11-1/4 inches across. That's how wide the beam is, and I didnt want it 'hanging over'. That alone kicked out quite a few fans we really liked. I know I didn't want the standard shiny-gold ceiling fan that looks like it should be hanging in a Victorian home.
 |
| Ug-lee! |
Kelly was 'less than enthusiastic' about the fan I wanted. I found myself unable to convince her.

We finally settled on a fan that seemed like it would work in the space available, and that fit the aesthetic we are shooting for. It's a Hampton Bay Hawkins 44" fan with reversible blades.

I had braced myself for the inevitable disagreement over what side of the blades we wanted to use, but surprisingly, we both liked the same ones (as shown in the picture). Installation was pretty straightforward. I had run 2 separate switches for it. One for the fan and one for the light. I had it all buttoned up and flipped the first switch. Viola! The light came on. I flipped the second switch and... Nothing. Somewhere between the switch and the fan, I must have done something to the Romex. We were good at the switch, but nothing on the other end. The only way to fix it would be to rip open the beam, and I did NOT want to do that. So I had re-wire it for one-switch operation. It sucked, because to get to the wiring, I had to remove the base cover, and to remove that you have to remove the blades and the light fixture.
In the end, I got it all wired up and it really looks good in the room.


The height is good, as I can stand under it with my hat on and not get thwunked by the blades. I can hit the light fixture, but there will be a bed there soon, and I don't see me walking through that particular part of the cabin after it's in. Weird thing is... when blowing 'down' the fan makes almost zero breeze under the fan. In fact, there is more of a breeze above the fan.. I'm guessing that with the blade tips being so close to the ceiling (only about an inch of so of clearance) that its somehow affecting airflow. It honestly feels about the same running in the 'up' or 'down' directions. I think it will still keep the air stirred up, but it seems kinda strange.

If you looked close enough to the second fan picture, you would have noticed that the trim on the front wall upstairs is done. In fact, all the trim except for one corner over the stairwell is done. I tried my hand at finishing up the trim alone, and it was very frustrating. Figuring out the angles was pretty easy for me. I brought my angle protractor from home. You can see it sitting on the window in the picture. It let me precisely measure the angles that I needed to cut. My big problem was getting the length right and getting my head wrapped around which way the angles go. I mis-cut a few boards, trying to do the first piece and I was getting pretty pissed. Kelly suggested that I just put it on hold till Mike can help me out. I told her "Nope! I'll burn down every stick of trim I have, but I am going to get this piece right"
I eventually came to understand what I was doing wrong with my measurements and cuts, and after that, I made decent progress. I even managed to reuse my mis-cuts on the other side of the cabin, so it really cost me nothing but aggravation. Still, I found myself having to think real hard when cutting. I knew I needed a 35 degree angle, but do I swing the saw to the left of the right? Is my length measurement the long side of the cut or the short side? It can drive a non-carpenter to drink.
I had (as usual) guessed wrong about my lumber requirements, so I came up a bit short. I bought 6 more sticks of 1x4 and I'll stain them and put them up next weekend.
October 9th 2015
A pretty major update this time. Actually two updates for the price of one. I hit a busy streak, so I didn't get to do an update before, so I'll give you both this time out.
Part One:
Some of the last things we had to do for the upstairs was to finish up the trim, and install a door for the bathroom. The door is an interesting piece of work. I wanted a solid pine door. I even picked out one at the local home store, but I waffled on the price. Over $210 for a pre-hung door. Not that I am opposed to spending money, but that's a lot for a door that few people will ever see. I tried checking Craigslist for a used door, but could not find one that met the 3 criteria of A) the right size, B) the right 'swing', and C) within a distance that I would want to drive to get.
Kelly pointed out a $78, hollow core door at Lowe's that was just white primered. Her argument was that its "just a door for the bathroom" and that in realty, nobody would ever see it as its upstairs in the bedroom. We treat our bedroom as our sanctuary, and we rarely let anyone into it. Even our kids know our bedroom is off limits unless invited. My point was that I would see it, and a stark white door just simply wouldn't work.
I did find a nice arch-top white door that I really liked, and I figured I would just paint it a dark brown or something.
Once again, Mike came to my rescue. It turns out that the guy is not only handy with a hammer, but he knows a thing or two about painting. I was talking to him about my door dilemma at his place one night, he pointed out his doors and said they were just cheap, white, hollow-core doors that he painted in wood grain pattern.

I was slightly stunned. All this time, and I thought they were wood doors! I asked him if he thought we could make the arch-top doors look "wooden-ish". He said "No Problem". I figure it was worth the $78 to pick up a door and try. If nothing else, I could always paint it solid brown and I'd be out nothing.
We decided to use the same stain that I used on my trim. It's basically smeared on with a rag, and drug out to make a wood-grain look to it. We started with the bathroom side of the door, just in-case we made a huge mess of it. While it looks easy, it does take a bit of technique. Mike was good, I was not. The 'inside' of the door looked OK, but I decided to bow out gracefully, and let Mike do the 'outside' side pretty much by himself.
 |
| The "inside" side. |
 |
| The artiste at work |
 |
| The finished "outside' side |
Now, I know that nobody is ever going to be fooled into thinking this is actually a wood door if they get right up on it. But from a few feet away, it does a convincing imitation of wood. We took it down to the cabin, but I did not have a chance to install it yet. Still, leaning up against the walls, it really fits the aesthetic that I wanted for the cabin a hell of a lot better than a plain brown (or white) door.
As far as the trim... It's all up and it looks great. Mike helped me with the last part over the stairwell, and it really made it go fast. I need to touch up a couple boards with stain, and there is one board that I cut perfectly to fit a rather tricky spot. However, I cut the angles backwards, so the side I stained is facing the ceiling instead of facing out like its supposed to. I said to hell with it... It fit so well that I put it up anyway. I'll just stain the showing side in place.
So the upstairs is basically finished. I need to install the door, put on the switch plates, and we decided that we want a small rail by the stairwell opening. Its all minor stuff.
Part Two:
For the last year or so, we have had our little camper pretty much permanently docked at the lake lots. It was really nice not having to drag it down each time we wanted to stay. In fact, having it down there sped up the cabin build, as there was a few times we just decided to go down at the last minute and spend the night. But all things must end.
Our camper is made by Forest River. They have an owner group called (naturally) the Forest River Owners Group, or FROG. I have 'know' a few guys on the FROG forum, but I have never actually met any of them. One thing FROG does is help sponsor rallies or get-togethers. On the FROG forum, there is a group of great, but slightly crazy people who go by the name Phat Phrogs. They had a rally in Nashville in August, and they invited us to come, but it was too close to our youngest son's wedding, so we had to decline. The second largest rally each year (in terms of attendance) is in a little German town named Amana, Iowa for Oktoberfest, and we decided to attend that one.
That meant hauling the camper off the lot and taking it home. I have always said that once I pull the camper out, it probably will never come back, so we needed to get the cabin "sleepable" for the Goose Creek Halloween Party. We talked about getting a new bed for our house, and taking our existing bed down to the cabin. Mike's father, a man who I am proud to call Dad, makes all kinds of beautiful furniture out of reclaimed wood. Mostly old pallets. He had a headboard in his guest room that I liked. I asked him if he would build me one, but with a slight twist to the design.
 |
| Under construction |

I asked Dad to give the boards in the panel a bit of a 'sunburst' treatment. I really think that turned out great. I decide to finish it in shellac and stain, just like the rest of the cabin. I took it home, and finished the pieces in my garage. The legs and 'frame' are dark stain, the inner panel is shellac.

I tried to give the old bastard some money for the headboard, but he refused and called it an early Christmas present. I even threatened to wrestle him to the ground and stuff the money in his pockets, when he pointed out that he had no pockets. It about brought me to tears. How fortunate am I to be a part of this family...
So... we had a mattress, the box springs, a bed frame, and headboard. Nothing left to do but move in! I found out that if you are very good, and try really hard, you can get an entire king-size bed into the back of a Ford Excursion. Getting all the parts upstairs was a challenge. The headboard, and frame were pretty easy. The box springs were less, as it was hard to get them around the corner in the stairs. But the mattress about killed me. I had Kelly, Teresa and Jen helping and between the grunting and fits of hysterical laughter, we finally got everything upstairs and put together.We had also bought some curtains and valances, and I figured I might as well put them up too.
Without further adieu, I present the finished upstairs!

We still have a couple night stands to bring down, and some pictures and such to hang on the walls. But this is pretty much how the upstairs will look.

And a nice, close-up shot of our headboard. It is exactly perfect for the cabin.

The downstairs had accumulated a lot of crap and construction materials over the last year. I have already started moving that stuff out, getting ready to start the finishing down there. The end is getting closer!
MOVING IN
October 14th 2015
After just over two years of work, we finally got to spend the weekend in the cabin. I can't put into words how cool it was, and what a sense of accomplishment I felt. I went down on Friday and stayed the night by myself, and then Kelly came down on Saturday. While not fully ready, it was close enough. I hadn't received the nice camping toilet that I ordered, so that made it a bit, ahem..."inconvenient", I did have the lamps and side tables, so I assembled the lamps and placed them and the tables where they are going. I'm not sure about the tables. I might get something different and use these downstairs as side-tables for the sofa.

I usually sleep very poorly the first night in a new place. Despite all the time I spent building this place, and the fact that I was in our old, comfortable bed, I slept very lightly. The cabin made a few noises/creaks/bumps with the wind that I never noticed before. It was also pretty chilly, and I neglected to set up the electric heater that I had brought. I woke up in the middle of the night shaking like a freezing wet dog. I plugged the heater in and it did a great job keeping the upstairs toasty warm. All the itching and bullshit that I put up with doing the insulation turned out to be well worth it.
Saturday was the annual Halloween Poker Run at the lake. The weather was beautiful and we had a good time. I had a good hand going after 3 stops, but then it all fell apart. Mike daughter Jenn won $22 on an attendance prize draw, so at least someone won something.
 |
| First stop at the Poker Run. |
 |
| (l-r) Raymond, Jenn and Me |
 |
| (l-r) Ray, Teresa, Andrew, and Mike |
Kelly finally made it down while we were at the winery, and we all headed back to the lots for some chili. We took a night run down below the dam, where I promptly got stuck in the mud and had to be yanked out. Eventually, we found our way up to Moon Mountain (where I took that awesome sunset photo above). This was during the Perseid Meteor Shower, so we were hoping to see some shooting stars. I saw a couple, but the kids said they saw lots. This run proved costly as I shredded a wheel-bearing on my UTV and had to call it a night early.
Turns out the insulation worked great for noise suppression too. One of Ray's friends Mike (everyone is named 'Mike" around here it seems...) has an unimproved lot at the lake. He brought his UTV to go riding and and left his truck and trailer at our lots. He wound up getting stuck under the dam with a couple girls. He managed to call another friend that came over and woke Ray up at 4am. "Other-Mike' had also blown a tire trying to get free, so Ray and Mike filled up my air compressor, and went down to get him. They got his UTV back, loaded and Other-Mike departed by about 6 am. And we never heard a PEEP! In fact we both slept like logs. It was really awesome to wake up and realize that I was in the cabin. Its a pretty nice thing to wake up to.
October 27th 2015
After our first weekend in the cabin, it was extremely clear to me that getting all the junk moved out of the bathroom and getting it working was the absolutely next thing that needed to be done. Of all the pictures I have ever taken, I realized that I never got one of just how jammed up with crap the bathroom had gotten. Leftover insulation and lumber, a couple cans of stain and shellac. Buckets of nails and screws, etc. It was just a convenient place to throw crap till later on. Well, it was now "later on".I still have a couple of pieces of insulation to put up under the floor on the over-hang of the bedroom, so I saved the unused pieces that I had, but I threw away all the large scrap pieces that I thought I would eventually need. I relocated the lumber and hardware, and swept and cleaned out the area. While I was doing that, Mike cut up the last few tongue and groove boards that I had brought down for the back wall and ceiling, to cover the insulation that I had previously put up.
Kelly had been on me a few times for spending too much time/money on making the cabin 'extra nice'. Her tendency is to go cheap(er), and mine is to go for the 'wow' factor. Her attitude is "good enough is good enough", where I'm like "for only an extra 40 bucks, it can be beautiful". Normally, I invoke executive privilege and do what the hell I want, but this time, she is getting her way. I was going to do the entire interior of the bathroom in the knotty pine like the rest of the cabin. But Kelly wanted me to just cover the insulation with some cheap bead-board, and leave the walls unfinished. He reasoning is that we have some nice storage racks that are just perfect to put between the studs, and that nobody will ever look inside the bathroom. Well... I wasn't about to go the cheap bead-board route, but I decided to leave the walls as they are. (Knowing of course that I can always go back later and finish them out with knotty pine if I ever really wanted to :wink wink:)
So I got the back wall and ceiling covered, and I fished the cable through in preparation for the light fixture that will eventually go there (it's downstairs, lighting up the living room for now). Mike and I then tackled putting in the door. A bit of trimming was needed, and I decided to scrap the trim that came with the door. It was just too "colonial" and did not match any other piece of trim in the cabin. But pretty soon we had the door in. The wood-grain painting that Mike did just looks awesome against the knotty pine walls.

I'm going to have to buy some 1"x2" board and stain them to match to use as trim. I also installed the doorknob and hardware. It's and oiled bronze look that perfectly compliments the ceiling fan, lamps and curtain rods.
The inside of the door needs no trim, it looks just fine in the 'unfinished closet" motif of the bathroom. When I put the laminate floor in the bedroom, I stopped at the edge of the bathroom due to all the junk in there. I wound up leaving a big flap of underlayment. I was thinking about putting the floor down while I was working on the bathroom, but I decided it can wait till next time.
The only thing left at that point was to put in the toilet. As I had mentioned before, I bought a Thetford Curve portable toilet. It came assembled, all I had to do was install the batteries for the flush pump. It looks small/short, but its actually not far off of a standard height toilet. Kelly has stubby little legs, so short is good for her anyway.
This thing is exactly as advertised. Clean, easy to use, easy to dump and totally odor free. It is on par with the toilet in our camper for "livability" and Kelly was most pleased with it over our weekend. About the only downside is it's pretty heavy and awkward to carry when filled with 5 gallons of freshwater.

So now all that's left is to just lay the floor, put up the trim around the door, and mount all the shelves. Kelly already brought down a mirror that's I hung just to the right of the door.
The weekend also had the annual Goose Creek Halloween party. Its a costume party, and we enjoy it a lot.

The 12 foot tall guy won the costume contest this year. I vowed I am going to win it next year.
November 9th 2015
I'm trying hard to finish up the last few little items in the upstairs before winter closes down construction on the cabin. I wanted to be able to say "IT"S DONE!" without having to add "except for this and this and this..." So I popped down on Saturday to see if I can finish some things finished up. I managed to cross most of the items off the list.
I got the floor down in the bathroom area, and installed an outlet for the night-light. I still gotta move the light fixture from it's temporary home in the living room, but the bathroom is done!

There might be a few more shelves or storage racks put it, depending on what Kelly wants, but this is pretty much its final form
I also picked up and stained some trim boards for the bathroom door. Getting those up let me put in the last few pieces of trim at the bottom. So all the trim upstairs gets the DONE stamp.

I also stained and installed all the wood outlet covers. I could not find a single-hole one to fit the air-conditioner outlet, so I swapped it out with a 20 amp duplex. It actually comes in pretty handy to have that extra outlet. I'm kinda kicking myself in the ass for not putting outlets on the wall opposite the bed.
One thing that I think I will add to the upstairs is a small railing by the stairs. I can see drunk-timmy taking a header off the stairwell hole because of not having a rail. I got a nice design thought up. It should look awesome. One last thing I see is that I never "finished" out the floor at the stairwell. I'll have to get some bull-nose or something to dress that up.
The last thing I did was put up the curtain tie-backs. They look a hell of a lot better than the 4 inch deck screws that I was using before. The curtains are "light blockers" so they are pretty stiff. If you just let them hang, they cover up so much of the windows that it stay pretty dark in there.
November 28th 2015
You might remember that back in October of 2013 I scored a really nice new propane vent-free fireplace for a super good price. In June of 2014 Mike "roughed" in and set in place, but I never have done much with it since then. About a month ago, we planned on camping down on the lot the weekend before Thanksgiving. As we have been having an extremely mild fall, it seemed like a good idea at the time. So of course, it was cold, rainy and had occasional heavy flurries and some sleet this weekend. Sitting around a campfire outside was OK after the rain/snow/sleet stopped, but as the afternoon wore on, it started getting cold. Really cold. As in, "Are we crazy for staying here tonight? levels of cold"
I've been wanting to (pardon the pun) fire up the fireplace just to test it out for a while now. I had an old BBQ grill that I kept the regulator and hose off of when I junked it. The pressure of the regulator matched the requirements of the fireplace, and I figured it might be a way to give it a test run, but I never got any farther than bringing the regulator down and throwing in a corner of the cabin. This seemed like a great time to give it a shot.
I grabbed the regulator and hose and took a good look at the fireplace. It had a braided hose on it with a pipe fitting that would connect to whatever gas supply brought to it. I didn't have any pipe fittings with me, but the flare fitting on the end of the stock hose where it goes into the main valve was the same as on the end of my BBQ regulator hose. 5 minutes later, I had it hooked it up to a 20lb propane bottle, crossed my fingers and pushed the pilot light button. The pilot lit just fine, and when I flipped the switch, there was a hiss of gas, a satisfying WHOOMPF and we had fire!

Probably not the ideal set up, but it worked more or less. The hose was way too short, and I while the pressure of the regulator was fine, I don't think it flowed enough to allow the fireplace to really crank up. But even with that, I gotta admit that it flat put out some heat. As it's a vent-free design, all the heat generated goes into the cabin with nothing going "up the flue". Within 5-6 minutes the cabin was enjoyably toasty. We wound up sitting in the cabin in our lawn chairs, sipping hot cocoa, and enjoying the warmth.

You can see the big propane tanks I got off Craigslist sitting next to the fireplace. One of them is even about a 1/4 full still. I'm gonna order a brand new high-flow regulator with a POL fitting to work with the tanks and about 15 feet of hose. I am gonna plant the tanks outside the back wall of the cabin, and just run the hose up through the floor to the fireplace.
Like as has happened so many times with this project, I'll have to rethink some my plans...My original plan was to put the fireplace on a thermostat and use it for the main heat on cold nights. Looks like that plan is going in the trash.
The cabin is very well insulated. Upstairs, I just have a plug-in 1500 watt ceramic heater. It easily kept the upstairs at 70 even though it got down to 19 degrees outside last night, even with the fireplace turned off. But when I went downstairs to make the coffee, you could see your breath inside the cabin. It was probably 35 degrees downstairs. Brrr. I had left the pilot light going on the fireplace, so I just flipped the switch and got things warming up quickly. It only took about 5 minutes before the wife called down that it was roasting hot upstairs. It's just gonna be too hard to control, as all the heat goes right up the stairwell to the bedroom. I already have the wires run for the thermostat on the wall, so I will still put in the thermostat, but I will mostly use it as an on-off switch. That would be way easier to reach than the little toggle switch behind the grill on the fireplace. I've ordered another ceramic heater for downstairs. Instead of using the fireplace as the main heat source, we will use the ceramic heaters at night. That pleases the wife, because she is worried as hell about dying of carbon monoxide, or a propane explosion, or a raging cabin fire by using the fireplace at night. The fireplace will be just for a quick heat-up and for ambiance.
You can't imagine how happy it made me to get the fireplace up and running, even on a temporary basis. It's been nearly two years since I bought it, and many times have I imagined how nice it will be to sit downstairs on a cold night an enjoy a nice warm fire. Ok... So my imagining didn't include an unfinished room and sitting on lawn chairs, but I will take it.
December 7th 2015
On Friday, The UPS man brought me the regulator, hose, thermostat and other bits that would let me run the fireplace off the big propane tanks. I ordered a Camco two-stage regulator and 15 feet of hose. I was going to put the big propane tanks on the backside of the cabin, thus needing the longer hose, but when I started to lay things out, I realized that the tanks are very visible to passing traffic. As I have yet to get a chain and lock for them, I wound up putting them on the right side instead of the rear, out of view of the more degenerate people around the lake. So that means I had about 10 feet too much hose, but there is plenty of room to roll it up and store it in behind the fireplace.
I expected the hose to come with a flare fitting like the end of my BBQ hose, which would let it just attach right to the fireplace. But for some reason, it actually had a 3/8" pipe fitting. Damn. I didn't have any nipples or fittings there. I played around with different configurations to see if I could make what I had work, but there was just no way. The closest I got was using the original braided hose from the fireplace, which had a 3/8" pipe fitting on the end, and see if I could scrounge up a 3/8" nipple. I stopped over at my buddy Dave's place at the lake on a "hail-Mary" mission to see if he might have some fittings. Turns out he had a 3/8 inch pipe about 4 inches long. That'll work!
Once I got back to the cabin, it only took a few minutes to hook everything up. I opened the tank valve and went inside to see if there was any signs of a leak. I found nothing out of place, so I tried to light the pilot and got NOTHING. Double damn. When I pressed the "pilot" button on the front, I could tell something was flowing out. I heard the faint hiss, and something was definitely blowing the flame from the lighter around. But no combustion. Then it dawned on my that I needed to let the hose purge all the air out. I remembered that the first time I tried to use the stove in the camper, it took forever for the lines to purge. For the fireplace, it took about 6-7 minutes of pressing the pilot button till it finally purged out and the pilot lit. I flipped the switch and again, the WHOOMPHF indicated that we had a fully functioning fireplace. I would say that the flame appeared larger this time, confirming my suspicions that the 20# tank and BBQ regulator would not flow enough to max out the burner.
I also remembered to bring down a small package of rock wool that came with the fireplace. The rock wool is placed on the burner to simulate glowing embers. I had left it at the house when I first tried out the fireplace. I read the directions, and I was skeptical that this little bit of fluff that looked like dryer lint could look like embers. Turns out I was totally wrong. It looks EXACTLY like glowing embers. It really changed the look of the fireplace.
I then installed and wired the thermostat. The pilot stays lit no matter what, but when the thermostat registers that it's getting too cold, it closes a contact which is electrically the same as flipping the "on" switch on the fireplace. After it was all hooked up, I set it at 70 degrees. After about a 10 second delay, the fireplace came on as just as I had hoped. With the fireplace sorted out, I set about assembling a small bench/storage cabinet to go at the foot of the bed.

It holds 3 of those 12 x 12 x 12 "cubbies" (which we have yet to buy) for storage, and is a convenient place for my stubby legged wife to sit and put her shoes on. But anyway, I put it together down stairs, and while I was working on it, the fireplace shut itself off. I looked over at the thermostat and sure enough it was 70 in the cabin. I had the front door open as the fireplace tends to smell kind of harsh for the first few hours of use, and when it cooled back down inside, the fireplace turned itself back on.
Now I know that I can heat up the cabin no matter how cold it gets outside, and keep it a constant, even temperature inside. This means that I can work on the inside over the winter, and not have a "winter construction shutdown" any more! I have decided that I want to have it 100% done, race-ready, and finished by the 4th of July 2016. My attempts to keep to a schedule have been a joke this whole cabin build. But I mean it this time. Cabin-warming party will be over the 4th of July weekend!
December 28th 2015
The fireplace is starting to show benefits already. We had our usual pre-Christmas vacation planned to start on the 17th. I wanted to see if I could get the downstairs walls finished. Right now the sequence is walls shellacked, fireplace finished, floor laid, cabinets installed and then finally trim put up. If I could get the downstairs walls done, that would be a HUGE chunk of the remaining work. I laid in 2 gallons of shellac and we got to it. First thing, after getting the fireplace going, was to move the accumulated stuff out of the way, sweep up, and wipe down the walls. The plain, unfinished wood stood in stark contrast to the warm and inviting wood upstairs.

As before, the shellac went on quickly. I rolled it on rather heavy with a 3/4" nap roller then followed up with a dry brush to knock down the roller marks and to fill in any missed groves. After I did two coats on the back wall, I thought the stair risers looked a little too pale. I did one coat on them just to match everything up.
 |
| Halfway down wall with first coat. Sorry for the blurry picture. I just work to damn fast. |
 |
| Dragging out the second coat. You can see the thermostat for the fireplace hanging loose. |
As we moved stuff around, I got the ceiling when and where I could.
 |
| One coat on kitchen wall and part of ceiling |
 |
| Second coat on the ceiling. All the walls had 2 coats by then. |
What I didn't factor on was how much of a strain it was to do them. My neck and shoulders hurt like hell for days afterwards. Kelly is way to short to help out on the ceiling, so I had to do it all myself. About the time I was halfway though the ceiling, I realized that I would be cutting it extremely close on shellac. I thought I had about a quart left over from the upstairs, but that must have gotten tossed somewhere along the line. I very desperately wanted to finish it all, mostly just to have it finished, but also because I didn't want to go through the pain of working overhead like that again. For a while there, I didn't think I would make it. But in the end, I had just enough. I'm talking like... I am halfway through the second coat on the last two boards, the tray is empty and the roller is drying up. I turned both cans over in to the paint tray and let as much as possible drain out and scraped what I could off the lids. There was maybe a quarter-cups worth of shellac. I sopped it all up on the roller and it just barely covered the last few feet of wood. Talk about cutting it close. I'm glad I didn't need to do 2 coats on the stair risers.
Surprisingly, I dribbled very little. A couple of drops on the floor, one right dead square in my eye (shellac STINGS like all get-out) and 2 drops right on my brand new sneakers. We started running out of light just about the time we finished, so we cleaned up, closed up the cabin and headed out to start our holiday festivities.
While we were off, I showed Kelly my idea for doing the rock around the fireplace. I really like the "stacked stone" look better than the traditional "field stone". I think it fits the 'modern rustic' aesthetic I am shooting for. Field stone is larger, more rounded stone with a hefty mortar joint.

Where stack stone is thinner stones with little or no noticeable mortar joints.

Doing a standard rock veneer requires a base of cement board, followed by felt, a metal lath, a "scratch coat" of mortar, and then finally you can place the rock. I am not a stone mason in any way, and rock veneer is really easy to make look like crap. I started looking into other options. I found a product called "Clip-Stone". A manufactured stone product with mounting wires cast directly into the stone.

You just nail up 1/2" plywood or OSB, and then mount the stones with screws through the upper wires. The previous course 'holds' the lower wires. It looks good, if a bit 'flat' as there is no real variations in depth of the stone. But it is easy for a guy like me to do.

So doing a little more digging, I found a product called GO-Stone from a company called Native Custom Stone. Link It's lightweight stone "tiles" that can be adhered to drywall or cement board with mastic tile adhesive. The GO-Stone has a really nice look, and considerable 'depth'.
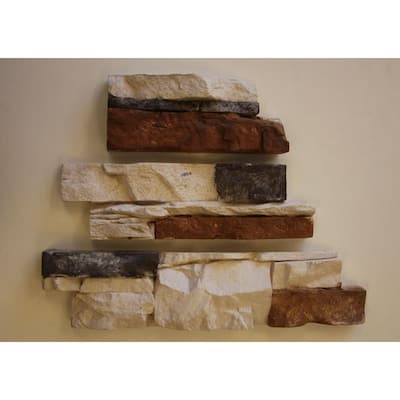

It's even a green product. It's base is made up of recycled rubber from tires. They somehow bond that with manufactured stone for the front face. Once installed, supposedly it looks and feels just like your actual stone. Each box only covers 5 square feet, but at $32 a box, it was worth a shot. I only needed 7.2 boxes, but I ordered 9 boxes just to make sure I have plenty. Even then, I only have about $300 in the stone. I have yet to see the product, but the reviews I have seen on it have all be positive. I should get the stone right after the 1st of the year. As usual, you can expect a full write-up on them when they arrive.
December 30th 2015
St. Louis is going through record flooding right now, and this has blocked access to my work. So I got a couple bonus days off. We were planning on going down to the lake for the New Years Eve party on the 31st, but I figured I could get a days work in first. I picked up three 3x5 sheets of 1/2" Hardi-Board. It is a cement backer-board that will be perfect at the base for the fireplace stone.

The Hardi-Board was easy to work with. It's a bit tougher to score-and-snap than standard drywall, so I wound up using my circular saw to cut it.

I used some 2" long fine thread drywall screws to secure it. I probably went overboard with the screws, but I figure better too many than not enough.


Unlike doing drywall, there is no need for taping the seams. They will be covered by the stones. Once I had all the Hardi-Board up, the true scale of the fireplace became apparent. I thought that the fireplace might have looked a bit "small" visually for the room. Now I am thinking it might be a bit "large" looking. It's amazing how much different and bigger it looked when it was all done. But I'm hoping it just looks big because I am so used to looking at it the other way.
Where the horizontal seam is about a foot above the top of the fireplace is where the big header is for the mantle. I found a really nice looking distressed wood mantle that would be perfect. It's hollow but looks like a solid 5 foot long 10x10 log. Unfortunately, the company that makes them is out of stock till mid-February.
Doing the Hardi-Board took less time than I thought it would. I figured I would tackle another job, the downstairs ceiling fan. Unlike the headache when I did the upstairs one, the downstairs one went together with no issues.

The fan moves the air pretty good. All the heat from the fireplace tends to stay on the ceiling, or go up the stairwell. With the fan on 'low' or 'medium' it blow the heat down and keeps the room comfortable. On 'hi' its pretty drafty. That might be nice for summer, butt not when it's chilly.
Further proof that Home Depot has a warped sense of humor... This is the fourth or fifth time I had ordered something online from them for pickup at the store. The last two times, I had to stop in the store for something in the morning, (the Hardi-Board this time) and when I got down to the lake, I got an e-mail from them saying my order was in. ARRGGH! They were probably just sitting there in the store when I was there. But I'm not too upset, because this time is was the stone I ordered. I stopped back by on the way home to pick it up, and maybe its a good thing that I waited because the 9 boxes pretty much filled up the Excursion.
I got the stone home and I took one box out because I couldn't wait till see what this stuff is like. I photographed the whole unboxing, just in case there was any shipping damage. After opening up the box, I realized that there was little chance of shipping damage;
 |
| Very nicely packed and taped. No visible damage so far. |
 | ||
| And inside, under approximately 276 pounds of styrofoam peanuts... |
 | |||
| ... is the actual box of stone. |
 |
 |
| It's like one of those Russia nesting dolls, but with stone, styrofoam and cardboard instead of babushkas |
I have to admit that the reviews were right. Despite having a base of shredded tire crumbs, the stones felt exactly like, well... stone! Other than being noticeably lighter than an actual rock, each piece was indistinguishable from a piece of natural stone. There was some 'bubbles' and pinholes on the edges, but these would be hidden upon installation. Also, this side view shows the variation in depth. This is one of the features that I like over the ClipStone.
Each box come with 15 pieces. 5 each of the16x4 inch, 12x4 and 8x4. Most of the pieces have an offset edge so the joint lines are not so noticeable, however there is 40 vertical inches of "finished" edges per box. I think they have 15 or more separate molds to cast these, as I didn't see two pieces that were the same in the box.

The back side has a pebbled surface that should really give the adhesive something to bite into. Also shown is the notched or 'offset' edge.

The front faces have a lovely shading and color variations. I'm not sure how they make this stuff, but I'm impressed with how natural it looks. The lower right hand corner has a peak with a couple of scuff marks, that looks like another rock was scraped or tumbled across it. This totally sells the look.

Just to get a feel for how a large section would look, I laid out 4 pieces on my kitchen table. Even just sitting there, I thought it looked fantastic. Its hard to tell that each 'rock' is not individual.


And again, the variations in depth make for a very interesting texture. I might have to mount a couple can lights in the ceiling just to highlight the stone. I saw a picture where I guy used low, set lights close to the wall to highlight the shadows. I like that effect.

January 18th 2015
We got a couple Saturdays to work on the fireplace. I really wanted an antique wood beam for a mantle, but I could not find one that fit the budget. I got to looking for different options on the internet and I found a company that makes faux wood beam mantles. They have a "distressed" model that looks awesome. Its a 'Shenandoah' model from Pearl Mantles. I ordered the 60" version for about $235 with 2-day shipping for an only an extra $5.
 |
| from the manufactures website |
It's not a solid wood beam, but you could never tell by looking at it. You can choose to not install the corbels on the bottom, but I think they look great. Mounting it is about as simple a job as I have done during the cabin project. Step one is to mark the center-line of your fireplace, and then determine how high you want the mantle to sit above it. Once you find that dimension, you mark a level line across the wall, and then mark the center-line of the installation cleat.
I'll apologize now for the blurry photos. For some reason, Kelly is incapable of taking a decent picture with my cell phone camera. It's not her fault. They look good on the phone display, but when I upload them I see how bad they are.

Once all the dimensions are laid out, then you need to drill some small pilot holes in the cleat so the wood don't split as you drive the screws. I drilled holes for about 7 screws. Probably overkill, but screws are cheap. After drilling the holes, I verified the cleat was level and screwed it to the wall. Don't forget that I had a big 2x10 above the fireplace, so I really didn't have to worry about the locations the of the holes


After the cleat is installed the mantle simple slips over the cleat.

I temporarily installed the mantle just to verify level and check if the height looked ok. It did. To make it easy, I didn't install the corbels. Satisfied with the placement, I pulled it back back down to install them

I will say this... You need way smaller hands than me to start the screws for the corbels. It was very snug, but I eventually got them all put together.

Once I had them all bolted up, I put the mantle back up and snapped a couple shots of the finished product.


With that job done, We finally started in on the stone. You want to start at the bottom, and I wanted to make sure that we got them laid out in a decent pattern. I screwed a couple 2x4s to the floor as a pattern for the bottom part.

Kelly took charge of laying out the stone. It took a little bit of picking and choosing to get everything 'balanced'. Once we were satisfied with the layout, I pulled up the boards and it was time to find out if the stone was as easy to put as the website and videos made it look.
I got set up and Kelly started handing me the stones one at a time and I put them up. In just a couple of mintues, we had the whole first row done.

So far so good. I kept checking on level as I went. I had placed some scraps of the laminate floor under the stone. That way, I had the space to tuck the real laminate under the stone and not have to install any kind of baseboard there. After about 20 minutes, we had the whole bottom section finished.

The stones on the right side needed cut to length. I used the recommended masonry blade in an angle grinder. The stone cut nice and clean and easy, but the grinder put out a hell of a lot of dust, and it smells like burning tires from the rubber particles. For that reason, I did all the cuts outside. It may have cost me a little time walking back and forth, but it was well worth it to keep the smell out of the cabin. I used the box the mantle came in as a cutting bench. That way, if I cut to deep and got into the cardboard, it was no big deal. Yes, I should have been wearing safety glasses. Despite all the safety training I have had at work, it never crossed my mind till I looked at this picture. I got lucky. Nothing got in my eyes. Don't do this kids. Wear your damn glasses.

I looked at how much we got done in such a short time, I figured that we might be able to finish up in one day. Ha! Right. What I didn't factor in was that there was only 3 stones on the bottom section that needed cut. After starting in on the sides of the fireplace, I realized that A) measuring and cutting the stones takes a bit of time and B) there are a LOT of stones to cut going up the sides of the fireplace.

Keeping the stone level was paramount. I checked every row.

Stone, even manufactured stone, is never made to a perfect dimension. In a couple of places, I had to chose between a nice tight joint, or staying level. I chose level, and used drywall screws as shims to keep everything lined up. I wish I would have painted the cement board a dark color, as with the gaps caused by keeping level, you can see the light board behind it. I'm gonna have to pipe some mortar in the gaps to cover things up. I hoped to have a mortarless look, but I'm gonna have to do what I have to do to get it to look good.
It took over an hour to get the left side of the fireplace done.

Then just under an hour to do the right side. I think I bought the wrong trowel. Digging the mortar out of the bucket was very difficult and I wound up getting mortar all over the handle and my hands. Despite my best efforts, I wound up getting some mortar on the fronts of the stone. I found it best to leave it where it is rather than wipe it off. Once it dries, it chips off easily even if it looks like crap in the pictures.

We started getting comfortable enough with the laying out part that we just winged it. Kelly selected the next stone to go in as we went along. We wanted a nice, random look with the colors and patterns. When we got up past the sides, work went quickly again. Or at least till we got up to the mantle. I got the first row that reached the corbels installed and that's when I cried "enough".
That was a pretty significant day all around. Thinking we could do it all in one day was a pipe dream, but I was still happy with what we got done. That was also including a late start, as we ran into some friends at breakfast and lingered over coffee for over an hour.

Walking back into the cabin after cutting the stones, I was always struck by how awesome the stone looked.

The following week, we went down with the hope of finishing up. Getting up to and around the mantle took a lot of measuring and cutting. It was slow going, but as this is the focal point of the fireplace, I made sure that everything was perfect.

Once above the mantle, the speed picked back up. Again, I kept a close eye on level, shimming up the stones where needed. It was well worth the effort and showed when we got to the top. The final row was a half height one. Had the stone been out of level, it would have been noticeable as a dead nun in a snowbank.
I had stressed and churned over in my mind for a couple years about how to do the fireplace. I looked into more than a few different ways. I had nightmares that it turned out poorly. Things like it looked awful, and stones fell off the wall. I knew this would be the crowning point of the interior, and I didn't know if I would be able to pull it off.
In the end, I think we managed to pull it off very well. Bear in mind, I still need to do a a little clean up removing the mortar 'boogers' and piping mortar into the bigger joints. And we have a decision to make on the hearth. I will probably go with some sort of stone slab, but that's something I can mull over for a while.

February 29th 2016
While winter should have not slowed down cabin construction, it sorta did. I thought the fireplace would keep it nice and warm for working on, and it did. But it still took awhile to get the temperature comfortable once we got down there. With the short days, some weekends it didn't seem worth the bother. Coupled with the fact that we have had other things to work on at our house, we didn't get too much done in February. But we weren't completely lazy. We did make it down a couple of times to work on the floor downstairs. That turned into a major ordeal at the start.
We needed to start laying the laminate at the far wall, where the TV will eventually go. But that wall, for whatever reason had a bit of a‘bow’ in it. Again, this is an over-glorified shed, so not everything is as straight, plumb and level as it should be. I’m generally OK with that, but every now and it rears up and bites me in the ass. Now the bow was noticeable, but nothing I couldn’t work around. It bowed in, so I just had to make sure that I snugged the floor board up to the bow in the center and kept it square to the end walls. I could cover the gaps on the ends with trim

I had raised the rock for the base of the fireplace up so that I could slide the floorboards underneath it for a nice, clean look. The fireplace is at a 45 degree angle, so I really only had one wall to go off of to check that I was square. I guess I wasn’t paying enough attention, because by the time I got past the fireplace, I realized that I was hopelessly out of square. Damn. What had happened was that the floor moved on me as I was laying it, and wound up looking like this.


Of course, I had more than 2 strips down. More like 20 or so before I realized that something was wrong. I saw no way to fix it short of pulling it all back up, and I was cursing manfully about the whole situation when Kelly asked me what the problem is. I told her about the bow in the wall, but she couldn't see it and asked me where. Now, I can be said that sometimes when I get angry, I turn into a bit of an asshole. This was one of those times. To point out exactly where the bow was, I gave it a good thump with my rubber hammer, saying "RIGHT HERE". It turns out that only the bottom pine boards on the inside wall was bowed. It went right back into place with the hammer thump. I'm not sure how/why it happened, but I drove a couple nails in it to hold it.
That's when I realized that if I could just drive the right side of the floor back into the now straight wall, everything would work out. It took a bit of wrangling, but I got the whole floor shifted back, and I only had to replace 2 pieces that were not too short on the other end up underneath the fireplace rock. The way the laminate snaps together, I had to pull up quite a few of the boards to get to the ones that needed replaced, but it was a small price to pay for dodging a major bullet
 |
| Shortly after correcting the problem |
After that, it was quick going, with Kelly handing me boards and me putting them in place, just like upstairs. I ran out of underlayment near the halfway point, so that made a nice place to stop for the first day.
We went down a couple weeks later, armed with some more underlayment on a really nice day. The first order of business was to move all the accumulated stuff out of our way. We have had our camping kitchen set up in the cabin for a while now where the cabinets and countertop will be. It worked out well, but now it had to move. Along with the sawhorses, some chairs, about 7 boxes of flooring, spare lumber, etc. etc. etc. It tool half the morning just to get to the point where we could start laying floor. It didn't take too long before the next hurdle appeared. Namely how to finish the floor by the door. I thought the floor would go under the threshold and make for a nice, clean appearance. Nope. The door I bought would not allow that, so I had to carefully cut and trim the pieces to fit flush up against the threshold. It turned out mostly ok, but I might put a piece of flat transition strip there to make it look perfect.
 |
| Looking in through the front door |
We got a good groove going and laid the floor just about all the way to the stairs. We knew going in that it was going to be a short day, so we finished up there for the day.
 |
| panorama from the front door |
 |
| From the window. |
I'm thinking one more day on the floor an it will be done.
At least I hope so...
March 16th 2016
Turns out I was right. We only needed one good day left to do the floor, but it was a bit tricky. We had to work around the stairs, and I never gave it much thought on what I am going to do there. I figured that I would enclose the bottom of the 3' x 3' landing with a small door to use to store seasonal items. At first I thought about not putting any laminate down in there as there would be a lot of complicated cuts, but I second-guessed myself again and decided to give it a shot.
 |
| One thing for sure, cutting the laminate inside makes one hell of a lot of sawdust. |

When all was said and done, I think the "under the stairs" area turned out pretty well. There is one small piece between the 4 x 4 and the stair riser that I'll have to nail down. It's too small to lock into the other boards properly. I'll still enclose that area, but if nothing else, it will be easier to slide the totes full of whatever into and out of the storage space. It's hard to tell in the picture, but I even put laminate down on the stair landing. Now just to select some sort of 'bullnose' or whatnot to finish the edge out.

And it took long enough, but something in this build finally went my way. The last strip of laminate fit up against the wall PEFECTLY. That means I didn't have to rip the width of the whole last row down. It's a small one, but I'll take my victories anywhere I can find them!

With a satisfying click the last piece snapped into place, and I am DONE with the floors! I learned enough on this project that I would feel comfortable putting in new floors at the house, but its going to be a while first. I don't know how the guys who lay floor for a living can do it. It's a helluva strain on the back and knees. But this means another big milestone on the build is over. Getting the floors done is a huge thing. Nothing else downstairs could proceed till that was finished.
While we were down there, we took some measurements of the "kitchen" wall with an eye to what we are going to do about cabinets. The bottom stair is exactly 11' from the front wall (the one with the door in the picture above. Playing around with some lawn chairs as stand-ins for the edge of the counter, we figured that we needed at least 2 feet of clearance to the bottom step in order to get to the steps easily. That leave 9 feet available, and 30" of it will be taken up by the fridge in the front wall corner. So that means I have 6'6" to play with. Not a huge amount of space, but I think we can come up with something.
Storage space at the cabin is practically non-existent at this point. There is some room under the bed, A couple of "cube" style organizers upstairs, some small shelves in the bathroom, and the aforementioned space under the stairs. There is no closet to speak of, but we will not be keeping much in the way of clothes down there. Mostly we will bring down our clothes and haul them back. with maybe a couple shirts/shorts etc, staying down there just in case. But even then, one thing we learned with camping in out RV's is that however much storage you have, you will need more.
The kitchen is not going to be a real kitchen. 99% of the cooking will be done outside, and with no running water in the place, there is no real need for a sink. The kitchen counter is just going to be a place to hold the coffee maker and microwave, but I know we want some drawers to hold the cooking utensils that we will leave at the lake full time, some bigger cabinets for pots and pans, and some storage for stuff like coffee, spices, snacks, paper plates, napkins, plastic cutlery and booze.
We had been looking at what's available in ready-made cabinets for a while. I used a ready-made 60" sink base on the snack-bar counter in the theater at the house. I got it from Home Depot and I was pretty happy overall with how it worked out. I don't care for that particular style for the cabin though. I like a Shaker look. Plain and simple with clean lines and not a whole lot of fussy ornamental moldings or edges. We found a style we like at Menards called Glenwood Beech.

After getting a catalog with all the dimensions, I set about in Microsoft Visio trying to come up with an efficient layout.

Once we are ready (which is now, actually) we are going to buy a new refrigerator for the house, and bring our existing one down to the cabin. One thing Kelly really wanted was a tall pantry next to the fridge. While not in the display in the picture above, they do offer one. The bad part is... I did not plan on putting a pantry there, so that's where I placed one of the dual-duplex electrical outlets. The pantry is going to cover that outlet up, so I will have to figure out a way to relocate it.
Next to the pantry in the overhead row will be a shelf for the microwave. We both like the idea of getting it up off the counter. This set up would give us plenty of useable storage in a rather compact space for around $900 (not counting hardware like drawer pulls).
The following Saturday, we needed to head down to the lake to get some measurements, and to make sure everything was going to fit like I had planned. I took a roll of painters tape to mark the outline of the cabinets so we could get a rough feel for how its going to work for us.
 |
| Any of my Control Engineer friends will see this and instantly think "RSView loss of communications" to the cabinet display |
After getting it all laid out, we tried a couple different placements of our lawn chairs to simulate the sofa we will have, again just to make sure the space will be livable. About the only change that we did was to the middle 2 base cabinets. I had originally envisioned them as two separate 15" wide cabinets, but while thinking about it, I figured that putting a single 30" wide cabinet in there would make more sense. It would still look the same with 2 doors and 2 drawers, but the area behind the doors would be a full 30" wide allowing storage of bulkier items. Turns out 1-30" wide cabinet is quite a bit cheaper than 2-15" wide ones. Bonus!
After finishing up laying out the cabinets, Kelly finally prodded me into putting together the 6-cubby storage shelf we have had in a box for a couple of months. I dread and hate assembling 'flat-pack' furniture, but this one wasn't so bad. After I was done, I had a bright idea and I took it into the bathroom and set it vertically (2 cubbies wide by 3 high) behind the toilet. It fit nicely, and we decided to get another one for that area.
I then moved the shelf to the location that Kelly wanted, and she comes out with a box of decorative knick-knacks that we have been collecting since we started this project. We had long ago decided that our primary motif was going to be bears. Specifically, black bears. Our great friends have taken that idea and run with it. We have gotten so many cool bear-themed things for the cabin as gifts over the last couple years, that I wonder where we can put everything.
I know that nobody should feel un-welcome at the cabin, because we have like 5 or 6 "Welcome to our cabin signs". Each and every one is cool as hell, so they are all going up. Due to the design of the upstairs, I'm kinda limited on wall space, but I'll find a way to get everything up if it kills me. Kelly started pawing through the box and lays out some of the non-wall mounted items (like picture frames, candle holders and whatnot) on the new cabinet. As she was going through the box, she pulled out a couple wall-mounted ones that I instantly had just the right place for upstairs, so I put them up. It's amazing how much a few small things like that can transform a room. It was already warm, and cozy, but now it was even nicer. With that, we went back downstairs and just sat there for a few minutes enjoying just being in the cabin.
Some of the decorations:
 |
| Bear coat hooks for our robes upstairs. |
 |
| Bear shotgun sign upstairs |
 |
| Painted saw and bear sign upstairs. |
 |
| Storage cubbies with bear paraphernalia. |
 |
| Sign on the bathroom door |
 |
| Nightlight in the kitchen. There is one just like it in the bathroom |
 |
| Cabin sign and bear in a barrel in the stairwell |
 |
| Bearadise sign. This actually covers up the breaker box |
That night there was a late hockey game on, and during one of the intermissions, I go online to Menards website to check out the price on the 30" base cabinet. That's when I see that they had a rather significant sale going on that was going to end the next day. While I was ready to pull the trigger on the cabinets, that is still a rather large chunk of change and I usually do a ton of research on things I spend that much money on. But we are talking about a 18% off sale, and I couldn't pass it up.
We went to Menards on Sunday to order them and apparently everyone else in St. Louis had the same idea. There was only 2 guys working the cabinet department, so I had to wait over an hour, but I finally got the everything ordered. Looking at early to mid April before they are in. I can probably start putting some trim up downstairs in the meantime.
The weather is turning warmer, the cabin is getting closer. Its gonna be a great summer!
April 18th 2016
I had gotten an email from Menard's that some of the cabinets arrived at the store. Actually finding them at the store was another thing. After giving the warehouse workers at Menard's my order sheet, I was treated to about 40 quality minutes of watching the workers wander around aimlessly with looks of utter confusion on their faces. The whole scene was vaguely familiar for some reason. Then it struck me... I have seen these guys before in the movie "Trading Places". The only thing missing was them arguing over who got to drive the forklift.
 |
| "No. It's my turn. You got to drive before lunch..." |
I love Menard's prices and selection, but sometimes I have to wonder if its all worth it. Eventually, the guys found my order and everything got loaded on my trailer. We are still missing the microwave shelf and the two 4-drawer cabinets, but I knew that those take longer to come in. We did get all the wall-mounted cabinets, so we could proceed with the installation.
Kitchen cabinets are yet another of those construction things that I have no knowledge of. I watched a couple of instructional videos online, and it seemed to me that it was something that was very easy to get wrong and pretty tough to get right. So I once again defer to Mike's skills. And once again he shows me how easy some of the stuff can be if you just use a little common sense. Armed with nothing more than his drill, a 4 foot level, some wood shims, and a tape measure, we had all the cabinets up in about 25 minutes. I really didn't even have much of a chance to take pictures of the installation.

The pantry was set in place first, and that set the height of all the wall cabinets. We'll install the base cabinets after they all show up. The installation was literally so simple that I would have redone the kitchen in my house years ago if I would have known how easy it is.

Kelly wasted no time in wanting to put stuff in the cabinets. Things we have been storing on and around the camping kitchen we have had temporarily set up in the cabin. Cups, plates, coffee stuff, a couple bottles of booze, some bottled water, etc. The side effect of all this is that we both agree that we may not need pulls on the drawers and doors. The cabinets work very well without them, and its a sleek look. We may give in a few months to get used to them and decide later if we want to put that hardware on.
We stayed the weekend at the lake and took care of a couple other things. One was getting rid of a huge brush/debris pile that accumulated over the last year where the pavilion will go. We have been waiting on the right weather so we could safely burn it. We ran a garden hose over from our neighbor Sue's house just in case and lit the pile. That thing burned quick and HOT! I used the hose to keep things under control and within an hour or so, there was nothing left but some larger (4") logs. By the next morning, there was nothing but a few inches of ash, and some coals still smoldering. This not only transformed the look of the place, but it cleared out the pavilion area so we can get going on that. Mike and I have talked over some ideas on what we want to do. Now we could play around with taking some measurements and laying things out. Mike will do up a sketch to take to get our building permit. We should have the permit in a week or two, then we can get going on the pavilion.
May 23rd 2016
A minor update this time. We've been working on the cabin pretty steadily over the last few weeks. The kitchen cabinets are fully installed, and we have begun staining the trim for the downstairs.

Kelly had to run an errand, so I started staining the trim boards on Saturday. I had bought 32 more 1x4 boards. I love how wood comes 'alive' with stain, but doing 32 of anything gets ponderous to me.
The staining process is simple, if messy. I just wad up a rag made from an old t-shirt, dip it in stain and wipe it with the grain along the wood. I then keep wiping till all the excess stain has been removed. I start with the edges, and I only do the 2 edges and whatever 'face' side of the board looks better. then I set them aside to dry while I do the next one.


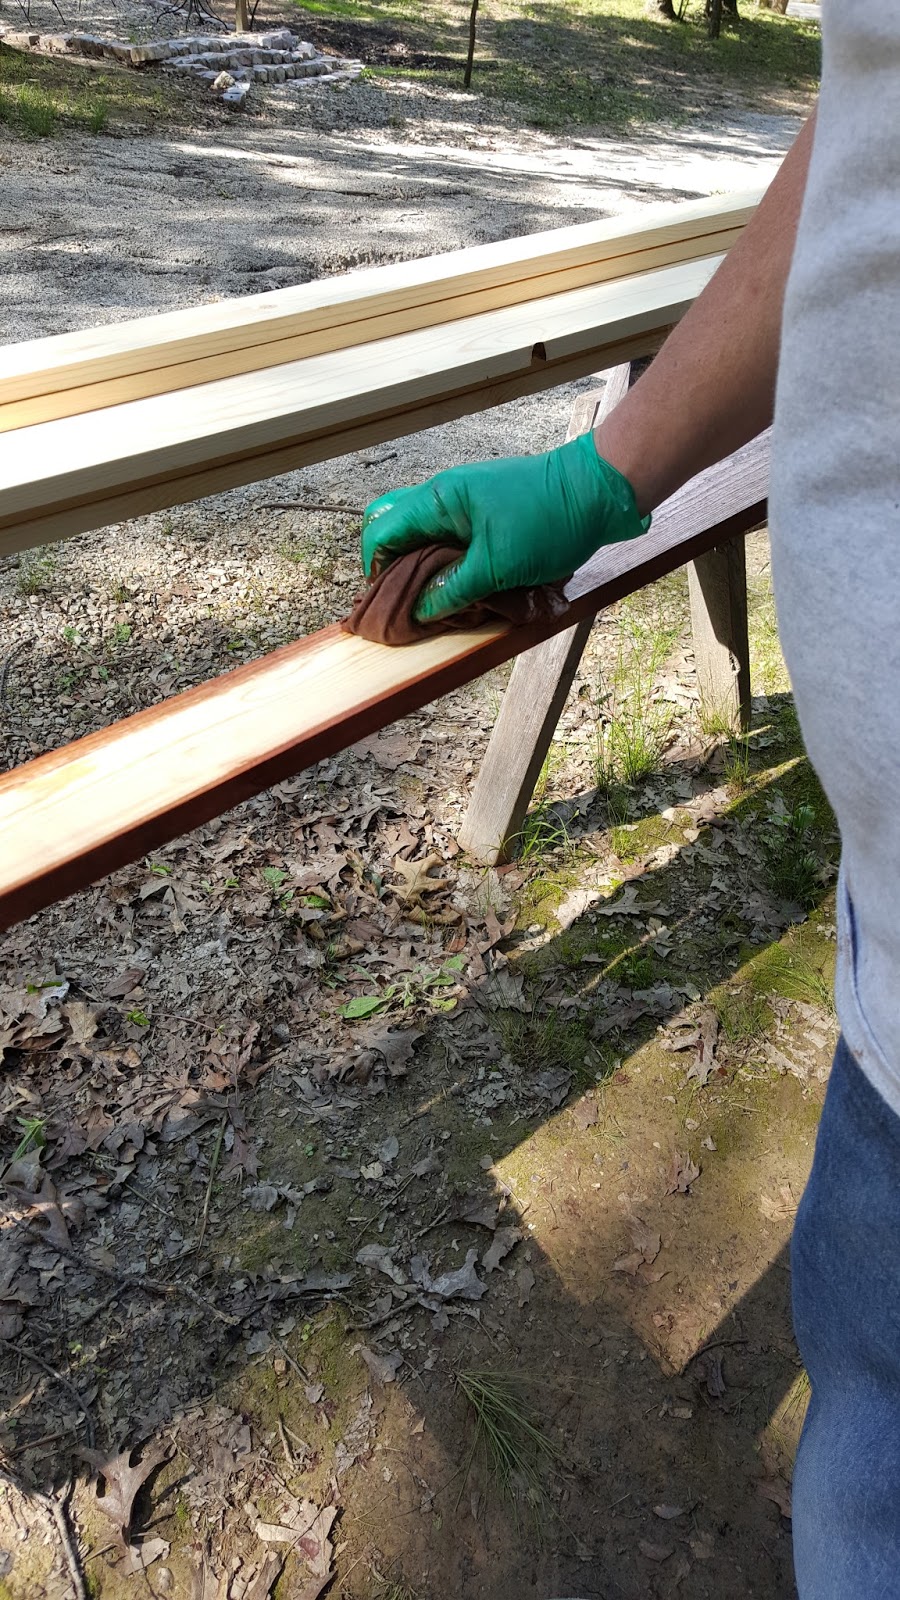
Of course, the rag gets completely soaked with stain, but that's ok. I found that I didn't need to wipe up the excess with a clean rag. As you apply the stain, the application rag will dry out, and then you can go and wipe down the excess. The more you wipe, the deeper and better the color gets. The boards were pretty much dry in an hour or so. I left them outside in the sun just to make sure they are fully dried, then we brought them back into the cabin. I wished I would have brought a miter saw. I probably could have had half the trim up already.
Next weekend is Memorial Day, and with that, we should be able to put the full and complete DONE stamp on construction on the inside. We have already started looking for the furniture we want. We both have and idea on what we would like, but finding the exact right pieces might be tough.
June 15th 2016
This update covers a side project that will go in the cabin. We recently bought a new refrigerator for the house. The old fridge still worked fine, but Kelly wanted a new stainless french-door fridge, and what she wants, she gets (mostly). So now we had a new fridge, and a perfectly good old fridge, and a need for a fridge in the cabin. You can see where this is going. The only problem is, the old fridge is 'refrigerator-white', and that color would not go well in the decor of the cabin. All along, I envisioned a black fridge. A good friend has all black appliances and I like the look a lot.
The only solution was to paint the fridge black. Rustoleum make a special appliance epoxy paint that I figured was worth a shot. First step (after hauling the fridge to the garage) was to clean it real good.

I used some Simple Green, my pressure washer and a stiff brush to give her a proper scrubbin'. After that, I pulled off the door handles, doors, and hinge hardware, and gave the interior a good cleaning as well.

Now the easy way to paint it would be to just leave the doors on and shoot everything. But that would leave the inside edge of the frame white. That's not my style. I wanted it to look like it came out of the factory black.
 |
| This has nothing to do with Jim Morrison |

Once I got it all masked off nicely, it was time to start shooting paint. It is recommended to lightly sand the existing paint, but I didn't have any fine sandpaper handy. I used the spray cans of the Appliance Epoxy, and as with all spray paints, multiple thin coats are way better than one or two heavy coats. I wound up putting on 4, with about an hour or so between coats.

Between coats I masked off the doors. I didn't know if I could paint the door seal, but I thought the white seals would look out of place, so I went ahead and painted it. I left the sealing face unpainted as I didn't know if the paint would affect the seal.
I wound up painting the inside edge of the the doors, and all the hardware as well. I left everything to dry overnight. The next day, I re-installed the hinges and doors, and painted the outsides of the doors. Later in the evening after the paint was reasonably dry, I reinstalled the handles.

I gotta say the appliance paint lived up to its hype. The refrigerator looked and felt like it came out of the box that way. Sometimes paint can look good, but not feel 'right'. Not this time.

The time it took to pull the doors and mask the interior proved worth it. The black goes all the end of the metal skin, and the white starts at the interior plastic. Again, just like factory.
About the only thing that didn't look 'factory' was the sides. The left hand side would be hidden by the front wall of the cabin, and the right side would be mostly covered by the pantry. The cheapskate in me saw no need to waste paint on those hidden surfaces.


It took 4 cans to do as much as I did. So for about $25 and a couple afternoons, I got a cool looking fridge for the cabin.
The following weekend, I took it down and installed it. It was a tight fit for sure. The opening for the fridge was set by the width of the little upper cabinet above it. There was not even a quarter inch to spare. In fact, the hinges on the front door stuck out enough to where I could not slide it straight into its hole. I had to come in a little cocked, and that bound things up. Eventually, with a little 'persuasion', I got it in its hole. Only then did I realize that I forgot to plug it in, and I had to muscle it back out to plug in the cord. Sigh. Never fails that anything I do, seems like I wind up doing it twice.
While it was sitting in the cabin, but before I put it in its hole, I noticed that I put the freezer door handle on upside down, so I had to fix that. Right now, the doors are hinged on the right side, and that makes it a bit clunky. The hinges are reversible, so i'll have to reverse them, but for right now its good enough.

With that, the kitchen area is nearly complete. The black fridge looked exactly how I envisioned it. One of the big pains-in-the-ass is lugging coolers down to the lake, then lugging them back. You always want to make sure you bring enough, so there is always drinks and stuff to put back up when you get home. I am sure I lugged the same can of coke to the lake and home again 4 or 5 times.
Now I can just leave them there. Plus we can leave stuff like ketchup and mustard and jelly and stuff that keeps well in a fridge, but would spoil quickly without. Kelly has some insulated tote bags we can use to bring down our cold food when we go to the lake. Each trip the cabin gets more and more livable.
February 20th 2017
As cabin construction wrapped up, I figured that updates to this blog are going to get further between, but I never planned on it taking me 8 months to give an update. I could have made this update 4 months ago, but my company's web policy prohibited me from launching the Blogger website, so I couldn't do updates at lunch, as I was used to doing. And it seemed that I always either was busy or kept forgettign in the evening when I got home. Ah, well. Time to get spun back up to speed. First off, the interior is 99% done. I think I have a couple switch plates to stain and install, I'm still mulling options on the fireplace hearth. There's a couple pieces of trim that I never got around to finishing, and I need to install a handrail for the stairs. They are kind of steep and can be tricky after a few "adult" beverages.
With construction wrapping up, we could start removing some of the things we kept down at the lake. Tools and materials and whatnot. We also scored some furniture for downstairs. I had an idea what I wanted for a sofa sleeper looks wise, and it took some time to find exaclty what I was looking, But the persistance paid off and eventually we found a nice blue/white checkered sofa on craiglist. My son also got me a rustic wood TV stand for Christmas a few years ago, and it has sat in the box till now. We had to wait till we had a place to put it, and finally, the cabin was finished enough to be able to put it together.


A small TV, Blu-Ray player and sound-bar was also purchased, just incase we have a rainy weekend and want to snuggle up inside. As you can see in the pictures, we have been putting up more of the decorations that we have accumulated. Those little touches really make the place warm and inviting. If you notice the folding camp chair in the corner, you can see we still have some more decorations to go. I brought that chair out one day when it was very cold and we had some company at the cabin. It turns out that seating is pretty much at a premium for guests. I think we will get some sort of small accent chair for that corner. Maybe a rocking chair...
Despite the glaring omission of a hearth stone, the fireplace has become the focal point of the room. Kelly has been going with her friends to these "wine and painting" classes and they really have a good time. The picture above the mantle is one of her first ones, along with some of the other knick-knack that she has picked up along the way.

Some other things we did was to make the kitchen fully functional. Again, this is just a 'galley' more than an actual full kitchen. We do all our cooking outside (other than microwaving the odd thing every now and then) So the countertop is mostly a place to hold the coffee and tea makers. Yes, there is quite a lot of booze in this picture. I honestly don't know where all this stuff comes from. I tend to only drink Capt. Morgan's rum and Kelly don't drink much hard liquor at all, so I'm still scratching my head on how we got them. One of the other minor things to do is make a set of curtains for the front doors. I came up with a neat design, and we even bought the stuff to make them a year or so ago. I want to try my hand at making them myself. This could wind up bad or good. We'll see...

Of course, the upstairs has been pretty much done for over a year now. We have added a few small thing like a bookshelf and a few decorative items. Of course, I have been informed that we still have a lot of stuff left to put up for upstairs too.


One other cabin project that I stared was an outdoor storage 'locker'. As everyone who does the "tiny house" thing figures out eventually, we are hurting for places to put things. The area under the stars still has a large collection of things like floating toys, fold up chairs, storage containers, fans, lights and other such things. All those things could be stored outside, if I could just keep the rain off of them (and the thieves out of them). Kelly has also been wanting an outside shower. It's nice that the lake has a shower-house available for use, but it'd be nicer to have our very own shower on our lot. I came up with an idea that will kill 2 birds with one stone. I am making a 4 foot 'addition' to the side of the cabin. The first half (4' by 8') will be an enclosed storage locker. The second half will be the outside shower area. The locker will be sided with the same T1-11 siding that the cabin has, with a green metal roof. For the shower part, I will re-use some of the old fence boards from the fence I am replacing at the house.
Now... as I have said many, many times, I am not a carpenter. My buddy Mike is. But I have learned so much from him on this project that the few times I had to stretch my wings and fly alone, they have turned out OK. This is another one of those times. There might be better or more lumber-efficient ways to do things, but I'm pretty sure the locker and shower will hold up. It's not like I am building the "Shed of Doom" (Google it, it's worth the effort)
 |
| Posts set for locker/shower |
 |
| Some framing |
 |
| Rafters for the locker in place |
 |
| Another view |
This picture shows what I have in mind. The front have will be the locker. The propane tanks will also go inside. I did mess one thing up. I will have to put one more 4x4 post in for the 'door' to the shower. It will go about 3 foot to the rear from the middle post. Not a big deal. Just gotta dig out the post hole digger again... The fence board will be done in a "shadow box" arrangement for the sake of modesty. I'm figuring about 5 or so feet high and maybe a foot off the ground. Enough to provide privacy, but still let you know you are showering in (pretty much) the great outdoors.
 |
| Storage on the left, showers on the right. |
When I put up the siding, it really shows how the siding on the cabin has been weathering. I thought it would turn more of a golden color than the awful grey that it did. A little bit under the overhang looks nice, but the rest is not pretty. That will definitely be addressed this year.

As seems to be the tradition on this build, the roof tin had a minor hiccup in delivery. I had already planned on going down that weekend, so I just put up the siding and door hardware instead. It looks kinda goofy without the roof, but it's only going to be like that for a week or two.
The door opens up to a full 180 degrees for easy access. I'm not expecting or needing "Fort Knox" levels of security. While there are some sketchy people at the lake, we have not had much of a problem with theft. There really won't be much of value in here, just the propane tanks, a couple lawn chairs, some water floaties, maybe a tarp or two, and some other odds and ends. But you know the old saying, "out of sight, out of mind" The hinges and other door hardware are installed with anti-theft screws just because I had some. But if they really wanted in, a few minutes with a sawzall is all they need. I am finding out is that most of the thieving meth-heads in the lake won't work that hard.

I'm eventually going to put some gravel down for a 'floor'. Just so we don't have mud in the locker. We scored some a heavy plastic shelving unit at the thrift store which will be installed as soon as the roof is on.

From the moment we got the roof on the cabin, it has been used as for storage. Look back at June of 2014 when I was starting the insulation and you can see how bad it was. We have pared down the pile to mostly stuff that will remain at the lake, but I know Kelly is anxious to get the last of that stuff out of the cabin. All we need some roof tin at this point.